Showing posts with label RAC. Show all posts

How to find RAC Cluster Name and Version

How can you find the name of your RAC Cluster


It is really easy to find the name or RAC cluster. Just use the below methods

Option 1

execute below command from CRS_HOME/bin

$cemutlo -n
rac11

Option 2

execute below command from CRS_HOME/bin

$olsnodes -c
rac11


Option 3

navigate to the directory $CRS_HOME/cdata. Under this directory you will find a directory with the name of cluster which includes the OCR backup

cd $CRS_HOME/cdata
ls
localhost  node1 node1.olr  rac11


How to Find the Clusterware (CRS) version in Oracle RAC

follow the steps below to find the clusterware version (Grid infrastructure ) of your RAC cluster

to see on current node

$crsctl query crs softwareversion
Oracle Clusterware version on node [node1] is [12.1.0.2.0]

to see on all the nodes

$ crsctl query crs softwareversion -all
Oracle Clusterware version on node [node1] is [12.1.0.2.0]
Oracle Clusterware version on node [node2] is [12.1.0.2.0]

to see on a particular node

$ crsctl query crs softwareversion node2
Oracle Clusterware version on node [node2] is [12.1.0.2.0]

You can check the active version from below command

$ crsctl query crs activeversion
Oracle Clusterware active version on the cluster is [12.1.0.2.0]

Cluster Resource Activity Log Oracle RAC 12c

Cluster Resource Activity Log Oracle RAC 12c: Explained


What is Cluster Resource Activity Log?


Oracle Clusterware stores logs about resource failures in the cluster resource activity log, which is located in the Grid Infrastructure Management Repository.

Where to Find Cluster Resource Activity Log?

Cluster Resource Activity Log is stored in Grid Infrastructure Management Repository Database

Managing the Cluster Resource Activity Log

How to Query the cluster resource activity logs ?


$crsctl query calog

2017-06-17 17:15:57.133000 : Starting Oracle Cluster Ready Services-managed resources on server 'node1' : 149771255713213096/0/1 :
2017-06-17 17:15:57.143000 : Server 'node1' has been assigned to pool 'Free'. : 149771255713213096/0/2 :
2017-06-17 17:17:08.580000 : Resource 'ora.net1.network' has been registered. : 149771255713213096/152/1 :
2017-06-17 17:17:16.867000 : Resource 'ora.node1.vip' has been registered. : 149771255713213096/186/1 :
.
.
.
2017-06-17 18:29:13.580000 : detected unplanned state change of resource 'ora.scan2.vip' from state 'ONLINE' to 'OFFLINE' : 149771255713213096/3861/1 :
2017-06-17 18:29:13.616000 : Attempting to clean 'ora.scan2.vip' on 'node1' : 149771255713213096/3861/2 :
2017-06-17 18:29:13.671000 : detected unplanned state change of resource 'ora.LISTENER_SCAN2.lsnr' from state 'ONLINE' to 'OFFLINE' : 149771255713213096/3864/1 :
2017-06-17 18:29:13.848000 : Start of 'ora.net1.network' on 'node1' failed : 149771255713213096/3860/3 :
2017-06-17 18:29:13.848000 : Attempting to clean 'ora.net1.network' on 'node1' : 149771255713213096/3860/4 :
2017-06-17 18:29:13.859000 : Clean of 'ora.scan2.vip' on 'node1' succeeded : 149771255713213096/3861/3 :
2017-06-17 18:29:13.860000 : Attempting to start 'ora.scan2.vip' on 'node2' : 149771255713213096/3861/4 :
2017-06-17 18:29:13.882000 : detected unplanned state change of resource 'ora.scan3.vip' from state 'ONLINE' to 'OFFLINE' : 149771255713213096/3866/1 :


How much space is allocated for Cluster Resource Activity Log?

$ crsctl get calog maxsize

CRS-6760: The maximum size of the Oracle cluster activity log is 1024 MB.

What is Retention Time for Resource Activity Log ?

$ crsctl get calog retentiontime

CRS-6781: The retention time of the cluster activity log is 73 hours.

Can We Change the Size and Retention time ?

yes you can Change it as follows

$crsctl set calog maxsize 2048

$ crsctl get calog maxsize

CRS-6760: The maximum size of the Oracle cluster activity log is 2048 MB.

Note if you try to reduce the MaxSize you must use -f Option

$ crsctl set calog maxsize 1024

CRS-40020: The operation will delete all entries in cluster activity log. Rerun with '-f' option.
CRS-4000: Command Set failed, or completed with Errors.

$ crsctl set calog maxsize 1024 -f
$ crsctl get calog maxsize

CRS-6760: The maximum size of the Oracle cluster activity log is 1024 MB.

Changing the Retention Time

$ crsctl set calog retentiontime 80
$ crsctl get calog retentiontime

CRS-6781: The retention time of the cluster activity log is 80 hours.

Note if you try to reduce the Retention Time you must use -f Option

$ crsctl set calog retentiontime 70

CRS-40020: The operation will delete all entries in cluster activity log. Rerun with '-f' option.
CRS-4000: Command Set failed, or completed with errors.

$ crsctl set calog retentiontime 70 -f
$ crsctl get calog retentiontime

CRS-6781: The retention time of the cluster activity log is 70 hours.
I hope you have enjoyed the post. If you like my work please leave your Comments/ Suggestions in the Comment Section.

If you have any questions please leave in comment Section I will try to answer ASAP


What all you can query with crsctl query command in 12cR2

Complete Reference of crsctl query Command RAC 12cR2


Display CRS admin list

$ crsctl query crs administrator
CRS Administrator List: oracle root
    
Gets the value of automatic start delay and server Count

$ crsctl query crs autostart
'Autostart delay':       0
'Autostart servercount': 1

Lists the Oracle Clusterware active Version

$ crsctl query crs activeversion
Oracle Clusterware active version on the cluster is [12.2.0.1.0]

List the cluster state and active patch Level

$ crsctl query crs activeversion -f
Oracle Clusterware active version on the cluster is [12.2.0.1.0]. The cluster upgrade state is [NORMAL]. The cluster active patch level is [0].

Lists the Oracle Clusterware release version
    
$ crsctl query crs releaseversion
Oracle High Availability Services release version on the local node is [12.2.0.1.0]
Lists the version of Oracle Clusterware software installed

$ crsctl query crs softwareversion -all
Oracle Clusterware version on node [node1] is [12.2.0.1.0]
Oracle Clusterware version on node [node2] is [12.2.0.1.0]

Lists the Oracle Clusterware release patch level
 
$ crsctl query crs releasepatch
Oracle Clusterware release patch level is [0] and no patches have been applied on the local node.
Lists the patch level of Oracle Clusterware software installed

$ crsctl query crs softwarepatch
Oracle Clusterware patch level on node node1 is [0].
Lists the Last active timestamp of a leaf node in case of Flex Cluster

$ crsctl query crs lastactivetimestamp
  CRS-41006: Node node1 is not a leaf node.
Note:- you will get proper oputput if you have Flex Cluster configurtion
 
List the site to which the node or disk belongs.
 
$ crsctl query crs site -n node1
Node 'node1' belongs to site 'rac01'
$ crsctl query crs site -d DISK1
Disk 'DISK1' belongs to site 'rac01'

Checks whether Oracle Clusterware has been configured for IPMI

$   crsctl query css ipmiconfig
CRS-4237: Oracle Clusterware is not fully configured to use IPMI
Checks whether the IPMI device/driver is present

$ crsctl query css ipmidevice
CRS-4218: Unable to access an IPMI device on this system
    
Lists the voting files used by Cluster Synchronization Services
$ crsctl query css votedisk
##  STATE    File Universal Id                File Name Disk group
--  -----    -----------------                --------- ---------
 1. ONLINE   c3723335e2f14f2abf29a7f3e1f8d2cf (/dev/oracleasm/disks/DISK2) [OCR_VOT]
 2. ONLINE   d70e3c6100f34f32bff4d18de037ed7b (/dev/oracleasm/disks/DISK1) [OCR_VOT]
 3. ONLINE   c28a7ab739174f41bf61e9fef170a291 (/dev/oracleasm/disks/DISK3) [OCR_VOT]
Located 3 voting disk(s).

Check if the designated wallet or user exists
    
crsctl query wallet -type [-name ] [-user | -all]
where
     wallet_type     Type of wallet i.e. APPQOSADMIN, APPQOSUSER, APPQOSDB, MGMTDB, OSUSER or CVUDB.
     name            Name is required for APPQOSDB and CVUDB wallets.
     user_name       User to be queried from wallet.
     all             List all users in wallet

List the system configured DNS server, search paths, attempt and timeout values

$ crsctl query dns -servers
CRS-10018: the following configuration was found on the system:
CRS-10019: There are 1 domains in search order. They are:
oracle.com
CRS-10022: There are 1 name servers. They are:
192.9.1.102
CRS-10020: number of retry attempts for name lookup is: 4
CRS-10021: timeout for each name lookup is: 5

query the resolution of Server from DNS

  crsctl query dns -name [-dnsserver ] [-type ] [-port ] [-attempts ] [-timeout ] [-v]   

Where
    name                Fully qualified domain name to lookup
    DNS_server_address  Address of the DNS server on which name needs to be looked up
    query_type          The query type is A or AAAA for IPv4 or IPv6 respectively. The default query_type is A.
    port                Port on which DNS server is listening
    attempts            Number of retry attempts
    timeout             Timeout in seconds

$ crsctl query dns -name node1.oracle.com -dnsserver 192.9.1.102
CRS-10024: DNS server returned 192.9.1.100  for name node1.oracle.com

$ crsctl query dns -name scan -dnsserver 192.9.1.102
CRS-10024: DNS server returned 192.9.1.120 192.9.1.121 192.9.1.122  for name scan

List the cluster resource Activity log.

  crsctl query calog [-aftertime ] [-beforetime ] [-duration | -follow] [-filter ] [-fullfmt | -xmlfmt]

 List the valid credentials targets to be used with credentials commands

$ crsctl query credentials targetlist

List the valid credentials under a specific target

crsctl query credentials -target
List the nodes and disks that the sites contain.

  crsctl query cluster site { | -all}
Where
       site_name             The site name to be queried
       -all                  List all sites.

$ crsctl query cluster site -all

Site 'rac01' identified by GUID 'b8d38f6a064f6f7aff8334e9061f3cc4' in state 'ENABLED' contains nodes 'node1,node2' and no disk.
Obtain Member Cluster Configuration Information
 
crsctl query member_cluster_configuration []

where
        member_cluster_name    Name of the Member Cluster
         If no member cluster name is provided then the details of all
         the member clusters are displayed.

CRS-09118: Grid Infrastructure Management Repository connection error

How to Resolve CRS-09118: Grid Infrastructure Management Repository connection error 12cR2 RAC


crsctl query catlog
CRS-09118: Grid Infrastructure Management Repository connection error

The crsctl Utility is not able to comunicate with Management database

checking repository database configuration

$ srvctl config mgmtdb
Database unique name: _mgmtdb
Database name:
Oracle home:
Oracle user: oracle
Spfile: +DATA_MGMT/_MGMTDB/PARAMETERFILE/spfile.269.946921407
Password file:
Domain:
Start options: open
Stop options: immediate
Database role: PRIMARY
Management policy: AUTOMATIC
Type: Management
PDB name: GIMR_DSCREP_10
PDB service: GIMR_DSCREP_10

Cluster name: RAC01
Database instance: -MGMTDB

check if PDB service is registered with MGMTLSNR

lsnrctl status MGMTLSNR | grep -i GIMR_DSCREP_10

As you can see the Service is not registered with Listener

checking repository database for PDB service existance

Login in management database and execute following queries

$ export ORACLE_HOME=/u01/app/12.2.0.2/grid
$ export PATH=$PATH:$ORACLE_HOME/bin
$ export ORACLE_SID=-MGMTDB
$ sqlplus "/as sysdba"

SQL> show con_name

CON_NAME
------------------------------
CDB$ROOT
SQL>
SQL>
SQL> show pdbs
    CON_ID CON_NAME                       OPEN MODE  RESTRICTED
---------- ------------------------------ ---------- ----------
         2 PDB$SEED                       READ ONLY  NO
         3 GIMR_DSCREP_10                 MOUNTED

SQL> alter session set container=GIMR_DSCREP_10;
Session altered.
SQL> select name from dba_services;
NAME
----------------------------------------------------------------
gimr_dscrep_10

-- As you can see Service is Present

Let's start the Service

SQL> exec dbms_service.start_service('gimr_dscrep_10')

$ lsnrctl status MGMTLSNR | grep -i GIMR_DSCREP_10

Service "gimr_dscrep_10" has 1 instance(s).

Now the listener is listining for gimr_dscrep_10 Service and Connection is successfull


How to Create RAC Database 12cR2

Step by Step instruction to Create 12c RAC Database


Once you are done with Grid Infrastructure Installation and Oracle DB Binary Installation you are ready create your first RAC database.


Step1: Execute DBCA from ORACLE_HOME/bin and follow the GUI instruction as shown below

cd /u01/app/oracle/product/12.2.0.2/db1

./dbca

choose create database and click Next


Choose advanced Configuration and click Next


Click Next


Select all the nodes on which you want to create the database and click Next


Choose appropriate (As per your requirement)Value for each field and Click Next


Choose the Appropriate Disk Group (in my case it is DATA) and click Next


You can enable the archivelog and specify the FRA (Flash Recovery Area) Location and Size. In this example I kept the archiving disabled. If left disabled you can enable it later


 Choose appropriate Memory Options and define the required charaterset from Character Set Tab and click Next


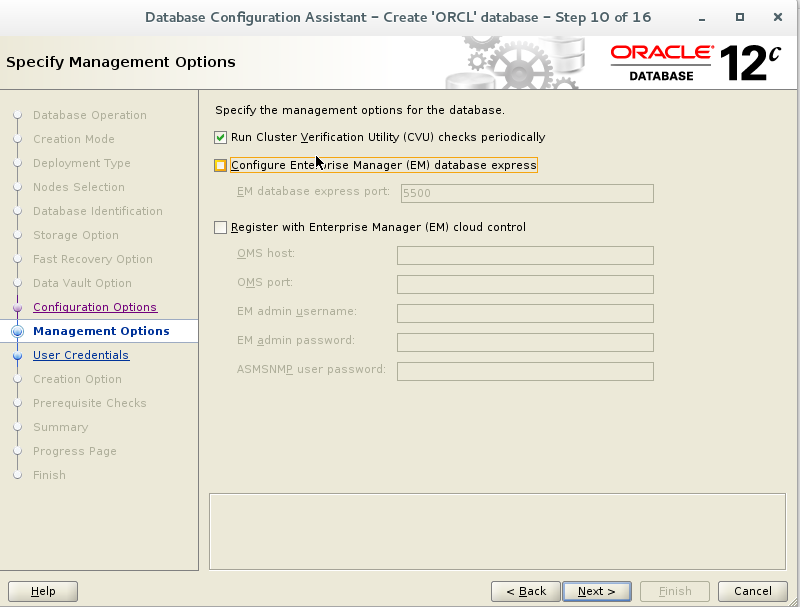
if you do not want to configure EM Express then untick it and click Next


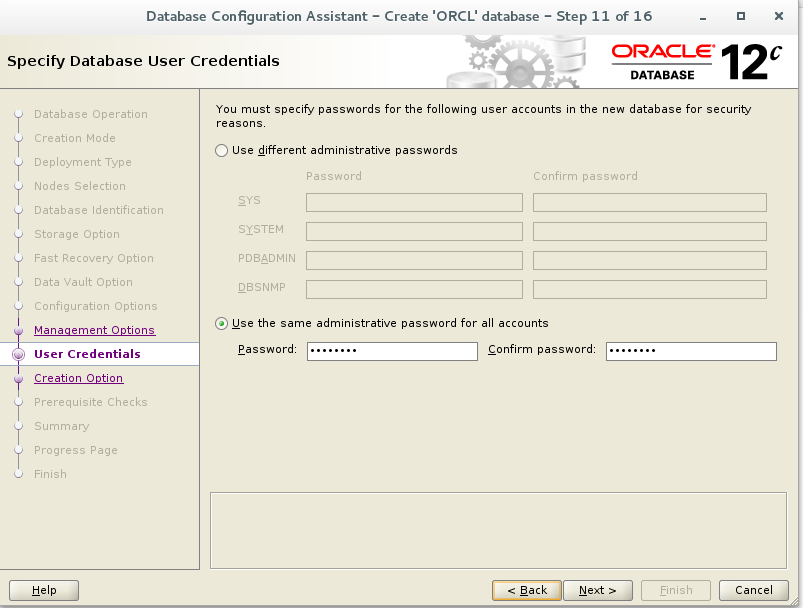
Enter the Password and click Next


Click Next


Click finish to create the database

Post successfull database creation validate the log files under $ORACLE_BASE/ cfgtoollogs/dbca/  (in my case /u01/app/oracle/cfgtoollogs/dbca/orcl)  and ensure there is no error.

Check the Status of the Database


Check the availibility of the database


$ srvctl status database -d orcl
Instance orcl1 is running on node node1
Instance orcl2 is running on node node2


check the configuration of the database

[oracle@node1 orcl]$ srvctl  config database -d orcl
Database unique name: orcl
Database name: orcl
Oracle home: /u01/app/oracle/product/12.2.0.2/db1
Oracle user: oracle
Spfile: +DATA/ORCL/PARAMETERFILE/spfile.272.947351843
Password file: +DATA/ORCL/PASSWORD/pwdorcl.256.947351319
Domain: oracle.com
Start options: open
Stop options: immediate
Database role: PRIMARY
Management policy: AUTOMATIC
Server pools:
Disk Groups: DATA
Mount point paths:
Services:
Type: RAC
Start concurrency:
Stop concurrency:
OSDBA group: dba
OSOPER group: dba
Database instances: ORCL1,ORCL2
Configured nodes: node1,node2
CSS critical: no
CPU count: 0
Memory target: 0
Maximum memory: 0
Default network number for database services:
Database is administrator managed


How to Install RAC Database 12cR2

Installing RAC Database 12cR2


Once you are done with Grid Infrastructure Installation, you are ready to install Oracle database binaries. The steps are very simple and you them right here

Step by Step RAC Database 12cR2 Installation.


Step1. Transfer the zipped database binaries to the target Server  (staging location) using your prefered method eg. Winscp

Step2. Unzip the binary at target Machine using the target Server Utility eg. unzip

$ unzip V839960-01.zip.

Note:- Do not unzip at source and then Transfer it to target.

Step3. Run Oracle Universal Installer  (OUI) by invoking  runInstaller from staging Location as Oracle user and follow the OUI instruction

$ ./runInstaller


Uncheck the security updates checkbox and click the "Next" button. Accept the warning by clicking yes


Select Install Database Software only Option and click next. If you want to install the Software and create the database as well then choose the Option accordingly.


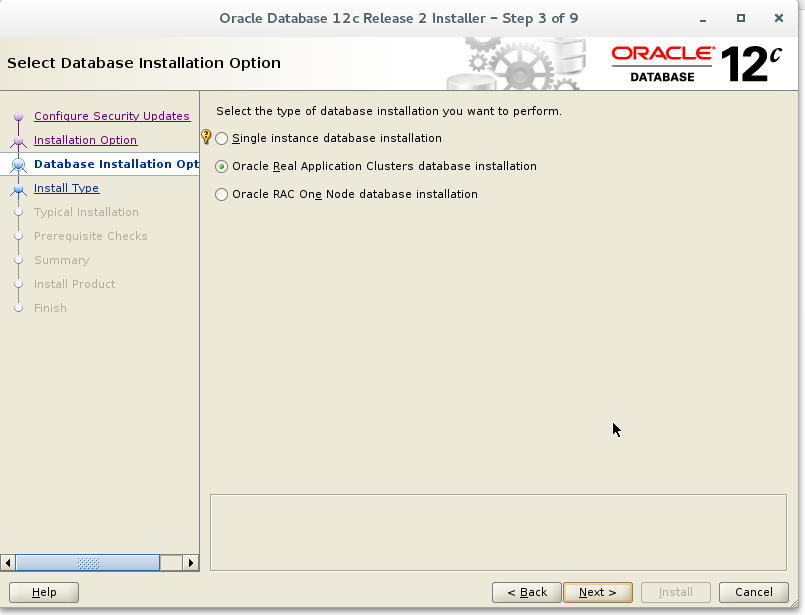
Select Oracle RAC database Installation and click Next


At this Screen select all the nodes in Cluster and proceed by clicking Next


Choose Enterprise Edition and click Next


Select appropriate Oracle Base and Oracle Home and click Next


Select appropriate OS Group and click Next


Ensure that all the Prerequisite Checks has been met and you are happy with the Summary then click on Install to start the Installation


Execute root.sh on bot the nodes as root user and respond to yes once you are done with root.sh execution


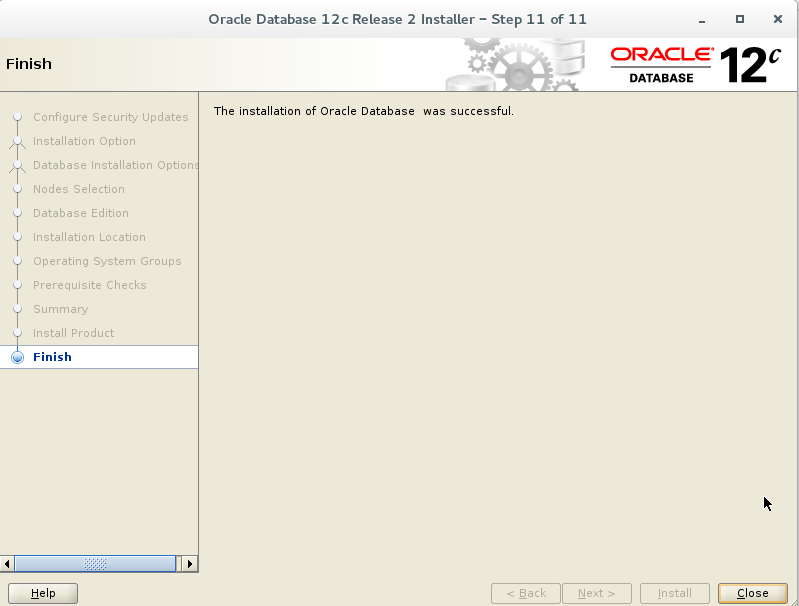
You are done with the Installation just click Close to Close the OUI.


Thanks for visiting here. Have fun with Oracle

Please leave you comments and Suggestions

How to Remove GNS Instances Oracle RAC


How to stop GNS Instance


 srvctl stop gns

How to remove GNS Instance


 srvctl remove gns
Remove GNS? (y/[n]) y

how to check the status of GNS


srvctl status gns
PRKF-1117 : GNS server is not configured in this cluster.


How to modify the role of a GNS instance


 srvctl modify gns -role Primary


How to Configure Highly-Available GNS

How to Add GNS


srvctl add gns -vip 192.9.1.152 -domain gns.oracle.com

How to Start GNS


srvctl start gns

How to Check GNS Status

srvctl status gns
GNS is running on node node1.
GNS is enabled on node node1.

How to Configure Secondry GNS


srvctl export gns -clientdata /u01/stage/gns_data_file -role secondary

copy the file to secondary GNS server.

configure secondary GNS server and start it

srvctl add gns -vip 192.9.1.153 -clientdata /u01/stage/gns_data_file
srvctl start gns


Note:- Ensure that the GNS Domain provided in -Domain Options is very well configured and resolved by your DNS Server.

Oracle RAC Split Brain and Enhancement in 12

What is Split Brain


In oracle RAC cluster N number of Servers are connected to each other to form a cluster. There servers are communicated to each other via Private Interconnect.

In case if nodes fail to communicate to each other (due to various reasons eg. eth Failure) they form a subcluster and they start operating independly as an independent cluster. This situation is called Split Brain and is really dangerous and lead to a integrity Problem.
Oracle do not let the independent clusters running and managing the database.

How does the Oracle Grid Infrastructure Clusterware resolve a “split brain” situation?


This is where the role of Voting disks come in picture. Each node in the cluster periodically sends their hatbeat to the voting disk. They mark their attendence to the voting disk saying they are alive in the cluster and the number of nodes they can communicate.
In Split Brain situations Voting disk is used to determine which node/sub-cluster will servive and which will be evicted.

and the algorith is as follows

  1. If the sub-clusters are of the different sizes, the clusterware identifies the largest sub-cluster which servives and evicts the smaller subcluster
  2. If all the sub-clusters are of the same size, the sub-cluster having the lowest numbered node survives.

What is Changed in 12c ?


The algorithm is changed a bit and Weight Based Node eviction concept is introduced.

Weight Based Node eviction?


getting curious....................................

Here you go..............

  1. If the sub-clusters are of the different sizes, the functionality is same as earlier the bigger one survives and the the smaller one is evicted.
  2. If the sub-clusters have unequal node weights, the sub-cluster having the higher weight survives so that, in a 2-node cluster, the node with the lowest node number might be evicted if it has a lower weight.
  3. If the sub-clusters have equal node weights, the sub-cluster with the lowest numbered node in it survives so that, in a 2-node cluster, the node with the lowest node number will survive.
and the best thing here is, you can use crsctl command to assign weight to instruct clusterware to consider your desires while taking eviction decision.

you can assign weigts to verious components as follows.

To assign weight to database instances or services, you use the -css_critical yes parameter with the srvctl add database or srvctl add service commands when adding a database instance or service. You can also use the parameter with the srvctl modify database and srvctl modify service commands.

• To assign weight to non ora.* resources, use the -attr "CSS_CRITICAL=yes" parameter with the crsctl add resource and crsctl modify resource commands when you are adding or modifying resources.
• To assign weight to a server, use the -css_critical yes parameter with the crsctl set server command.

You can also check the current settings

crsctl get server css_critical
CRS-5092: Current value of the server attribute CSS_CRITICAL is no.

Enough Theory ...Lets have some Practical

No Manual Weight is Assigned

crsctl get server css_critical
CRS-5092: Current value of the server attribute CSS_CRITICAL is no.


enp0s8 is used as Private Interconnect

oifcfg getif
enp0s3  192.9.1.0  global  public
enp0s8  10.0.0.0  global  cluster_interconnect,asm

2 node cluster and both the nodes are active

olsnodes -s -n
node1   1       Active
node2   2       Active

Lets stop the enp0s8 to simulate the communication failure between node1 and node2 and see what happens

ifdown enp0s8

olsnodes -s -n
node1   1       Active
node2   2       Inactive

2017-06-18 16:08:21.220 :    CSSD:1825834752: clssnmrCheckNodeWeight: node(1) has weight stamp(393228187) pebbles (0) goldstars (0) flags (3) SpoolVersion (0)
2017-06-18 16:08:21.220 :    CSSD:1825834752: clssnmrCheckNodeWeight: node(2) has weight
stamp(0) pebbles (0) goldstars (0) flags (0) SpoolVersion (0)
2017-06-18 16:08:21.727 :    CSSD:1825834752: clssnmrCheckNodeWeight: node(1) has weight stamp(393228187) pebbles (0) goldstars (0) flags (3) SpoolVersion (0)
2017-06-18 16:08:21.727 :    CSSD:1825834752: clssnmrCheckNodeWeight: node(2) has weight stamp(0) pebbles (0) goldstars (0) flags (0) SpoolVersion (0)
2017-06-18 16:08:21.727 :    CSSD:1825834752: clssnmrCheckNodeWeight: Server pool version not consistent
2017-06-18 16:08:21.727 :    CSSD:1825834752: clssnmrCheckNodeWeight: stamp(393228187), completed
(1/2)
2017-06-18 16:08:21.791 :    CSSD:1833719552: clssnmvDiskKillCheck: not evicted, file /dev/oracleasm/disks/DISK1 flags 0x00000000, kill block unique 0, my unique 1497779187
2017-06-18 16:08:21.791 :    CSSD:1843181312: clssnmvDiskKillCheck: not evicted, file /dev/oracleasm/disks/DISK3 flags 0x00000000, kill block unique 0, my unique 1497779187
2017-06-18 16:08:21.792 :    CSSD:1838450432: clssnmvDiskKillCheck: not evicted, file /dev/oracleasm/disks/DISK2 flags 0x00000000, kill block unique 0, my unique 2017-06-18 16:08:24.267 :    CSSD:1825834752: clssnmRemove: Start
2017-06-18 16:08:24.267 :    CSSD:1825834752: (:CSSNM00007:)clssnmrRemoveNode: Evicting node 2, node2, from the cluster in incarnation 393228188, node birth incarnation 393228179, death incarnation 393228188, stateflags 0x264000 uniqueness value 1497745656
2017-06-18 16:08:24.267 : default:1825834752: kgzf_gen_node_reid2: generated reid
cid=fbf86955c586cfcbbf3d85761fe601d7,icin=393228178,nmn=2,lnid=393228179,gid=0,gin=0,gmn=0,umemid=0,opid=0,opsn=0,lvl=node hdr=0xfece0100
2017-06-18 16:08:24.267 :    CSSD:1825834752: clssscFenceSage: Fenced node node2, number 2, with EXADATA, handle 0
2017-06-18 16:08:24.267 :    CSSD:1825834752: clssnmrFenceSage: Fenced node node2, number 2, with EXADATA, handle 0
2017-06-18 16:08:24.267 :    CSSD:1825834752: clssnmrFenceCLSFA: clsfaFence request issued for node(2), name(node2), fence type(3), handle(0x7f1a74274880)
2017-06-18 16:08:24.267 :    CSSD:1825834752: clssnmSendShutdown: Sending shutdown to node node2, number 2, with kill time 36297354 and reason clssnmKillReasonEvicted
2017-06-18 16:08:24.267 :    CSSD:1825834752: clssnmsendmsg: not connected to node 2


Conclusion:- Based on the running Services on the Server clusterware has itself calculated the node Weigt and evicted the node (Node2) which had lower weights as we can see after scaning the OCSSD.trc logs


OCR and Voting Disk

How to Find the OCR Location


ocrcheck -config

Oracle Cluster Registry configuration is :
         Device/File Name         :   +OCR_VOT

How to Find the Detail Configuration of OCR

ocrcheck -Details

Status of Oracle Cluster Registry is as follows :
         Version                  :          4
         Total space (kbytes)     :     409568
         Used space (kbytes)      :       2140
         Available space (kbytes) :     407428
         ID                       :  627991218
         Device/File Name         : +OCR_VOT/RAC01/OCRFILE/registry.255.946919521
                                    Device/File integrity check succeeded
                                    Device/File not configured
                                    Device/File not configured
                                    Device/File not configured
                                    Device/File not configured
         Cluster registry integrity check succeeded
         Logical corruption check bypassed due to non-privileged user

How to Find the Voting Disk Location

crsctl query css votedisk

##  STATE    File Universal Id                File Name Disk group
--  -----    -----------------                --------- ---------
 1. ONLINE   c3723335e2f14f2abf29a7f3e1f8d2cf (/dev/oracleasm/disks/DISK2) [OCR_VOT]
 2. ONLINE   d70e3c6100f34f32bff4d18de037ed7b (/dev/oracleasm/disks/DISK1) [OCR_VOT]
 3. ONLINE   c28a7ab739174f41bf61e9fef170a291 (/dev/oracleasm/disks/DISK3) [OCR_VOT]
Located 3 voting disk(s).


Startup of ASM Instance when ASM SPFILE is located in ASMDISKGROUP itself


How Voting Disk is located and ASM Instance Starts during clusterware Startup


In my last  POST I explained you a highlevel oracle clusterware startup sequence.
In that post I mentioned that clusterware usages special pointer to locate the voting disk when stored in SPFILE. Let us see how.

To read the SPFILE from diskgroup it is not necessary to open the diskgroup because all necessary information to access the data is stored in device's header itself
OHASD reads the header of the ASM disk containing ASM SPfile (as found from GPnP profile) and using the pointers in disk header, contents of ASM spfile are read. It usages kfed to read the disk header.
you dont need to open the disk if you want to scan using kfed


Lets Proof what I said.

Where is  GPNP Profile ?


ce /etc/oracle
cat olr.loc
olrconfig_loc=/u01/app/12.2.0.2/grid/cdata/node2.olr
crs_home=/u01/app/12.2.0.2/grid


cd /u01/app/12.2.0.2/grid/gpnp/node2/profiles/peer

Does GPNP Profile has an Entry for SPFILE path?

gpnptool getpval -asm_spf

Warning: some command line parameters were defaulted. Resulting command line:
         /u01/app/12.2.0.2/grid/bin/gpnptool.bin getpval -asm_spf -p=profile.xml -o-
+OCR_VOT/RAC01/ASMPARAMETERFILE/registry.253.946919517

Does OCR also contains a Copy of GPNP Profile (in 12c R2)

At this stage OHASD knows the diskgroup name and path of SPFILE by reading OLR


Let us identify how many disks are there in this DG


asmcmd lsdsk -G OCR_VOT
Path
/dev/oracleasm/disks/DISK1
/dev/oracleasm/disks/DISK2
/dev/oracleasm/disks/DISK3

 ls -lr /dev/oracleasm/disks/*
brw-rw----. 1 oracle oinstall 8, 28 Jun 18 02:27 /dev/oracleasm/disks/DISK8
brw-rw----. 1 oracle oinstall 8, 27 Jun 18 02:27 /dev/oracleasm/disks/DISK7
brw-rw----. 1 oracle oinstall 8, 26 Jun 18 02:27 /dev/oracleasm/disks/DISK6
brw-rw----. 1 oracle oinstall 8, 25 Jun 18 02:27 /dev/oracleasm/disks/DISK5
brw-rw----. 1 oracle oinstall 8, 24 Jun 18 05:19 /dev/oracleasm/disks/DISK4
brw-rw----. 1 oracle oinstall 8, 23 Jun 18 05:19 /dev/oracleasm/disks/DISK3
brw-rw----. 1 oracle oinstall 8, 22 Jun 18 05:19 /dev/oracleasm/disks/DISK2
brw-rw----. 1 oracle oinstall 8, 21 Jun 18 05:19 /dev/oracleasm/disks/DISK1
ls -lr /dev/sdb*
brw-rw----. 1 root disk 8, 25 Jun 18 02:27 /dev/sdb9
brw-rw----. 1 root disk 8, 24 Jun 18 02:27 /dev/sdb8
brw-rw----. 1 root disk 8, 23 Jun 18 02:27 /dev/sdb7
brw-rw----. 1 root disk 8, 22 Jun 18 02:27 /dev/sdb6
brw-rw----. 1 root disk 8, 21 Jun 18 02:27 /dev/sdb5

brw-rw----. 1 root disk 8, 28 Jun 18 02:27 /dev/sdb12
brw-rw----. 1 root disk 8, 27 Jun 18 02:27 /dev/sdb11
brw-rw----. 1 root disk 8, 26 Jun 18 02:27 /dev/sdb10
brw-rw----. 1 root disk 8, 17 Jun 18 02:27 /dev/sdb1
brw-rw----. 1 root disk 8, 16 Jun 18 02:27 /dev/sdb

At this Point we know the partiotions which consists  OCR_VOT DG

ok so far so good

How to read the disk Partotion Header using KFED

Now let us use KFED to read the Header of These Partitions.

[root@node2 ~]# kfed read /dev/sdb5 | grep -E spf
kfdhdb.spfile:                       23 ; 0x0f4: 0x00000017
kfdhdb.spfflg:                        1 ; 0x0f8: 0x00000001


[root@node2 ~]# kfed read /dev/sdb6 | grep -E spf
kfdhdb.spfile:                       23 ; 0x0f4: 0x00000017
kfdhdb.spfflg:                        1 ; 0x0f8: 0x00000001


[root@node2 ~]# kfed read /dev/sdb7 | grep -E spf
kfdhdb.spfile:                        0 ; 0x0f4: 0x00000000
kfdhdb.spfflg:                        0 ; 0x0f8: 0x00000000

From the above Output what we can conclude is

  the device /dev/sdb5 and /dev/sdb6  contains a copy of the ASM spfile (spfflg=1).
  The ASM spfile location starts at the disk offset of 23 (spfile=23)
Sehr Gut.

Now let us See what is stored there. just dump it using our favorite command dd

dd if=/dev/sdb5 of=spfile_from_sdb5.ora skip=23 bs=4M count=2
dd if=/dev/sdb6 of=spfile_from_sdb6.ora skip=23 bs=4M count=2

Why bs=4 (you can check the block size)

[root@node2 ~]# kfed read /dev/sdb5|grep ausize
kfdhdb.ausize:                  4194304 ; 0x0bc: 0x00400000


[root@node2 ~]# cat spfile_from_sdb6.ora
C"▒▒p8CC"*_+ASM1.__oracle_base='/u01/app/oracle'#ORACLE_BASE set from in memory value
+ASM2.__oracle_base='/u01/app/oracle'#ORACLE_BASE set from in memory value
*.asm_diskgroups='DATA_MGMT'#Manual Mount
*.asm_diskstring='/dev/oracleasm/disk*'
*.asm_power_limit=1
*.large_pool_size=12M
*.remote_login_passwordfile='EXCLUSIVE'
..................................................................
..................................................................

In the same way Vote disk is also accessed. Just go ahead and check. you can ídentify the voting disk using below query and afterwords ist same just find the Partition and grep vf (votefile).


Once the voting disk is accessible and ASM is started using the SPfile read above, rest you already know how it works. If you want to revise just click here
 crsctl query css votedisk

I hope you find the post interesting and have enjoyed it. Thanks and will see us again with some other interesting Topic soon...............

Takecare of yourself and Keep on learning..............


All About RAC Master Node

What is a Master Node in RAC


The master node in oracle RAC is node which is responsible to initiate the OCR backup.
Node-id of the Master node in rac is least node-id among the nodes in cluater
node-ids are assigned to the nodes in the order they join the cluater and therefore the node which joins the cluster first is designated as Master Node

Task of the Master Node


crsd process of the master node is responsible to initiate OCR backup
Master node is responsible to sync the OCR local cache across the nodes
only crsd process on the master node updates the OCR on disk
in case of node eviction, if the cluster is devided into 2 equal nodes the sub-cluster having the master node survives and the other sub-cluster is evicted


How to identify the Master Node in RAC


there are 3 possible ways

1> Identify the node which performs the backup of OCR

$ ocrconfig -showbackup
node1     2017/06/17 21:32:42     +DATA_MGMT:/RAC01/OCRBACKUP/backup00.ocr.281.946935141     0
node1     2017/06/17 21:32:42     +DATA_MGMT:/RAC01/OCRBACKUP/day.ocr.282.946935163     0
node1     2017/06/17 21:32:42     +DATA_MGMT:/RAC01/OCRBACKUP/week.ocr.283.946935165     0
PROT-25: Manual backups for the Oracle Cluster Registry are not available

2> Check  crsd logs from various nodes.

cat crsd.trc |grep MASTER

2017-06-17 17:30:51.457 :  OCRMAS:2797573888: proath_master: SUCCESSFULLY CONNECTED TO THE MASTER
2017-06-17 17:30:51.457 :  OCRMAS:2797573888: th_master: NEW OCR MASTER IS 1
2017-06-17 17:30:52.095 :   CRSPE:2384393984: {2:12188:2} PE MASTER NAME: node1
2017-06-17 17:31:54.926 :  CRSOCR:2388596480: {2:12188:2} Registered PE standby with CSS. I AM A STANDBY MASTER.
2017-06-17 23:14:47.617 :  CRSOCR:2390697728: {2:12188:3229} Deregistered PE standby with CSS. I AM NO LONGER A STANDBY MASTER.
2017-06-17 23:21:50.596 :  OCRMAS:1748141824: proath_master: SUCCESSFULLY CONNECTED TO THE MASTER
2017-06-17 23:21:50.596 :  OCRMAS:1748141824: th_master: NEW OCR MASTER IS 1
2017-06-17 23:21:51.874 :   CRSPE:1121937152: {2:46838:2} PE MASTER NAME: node1
2017-06-17 23:22:15.020 :  CRSOCR:1130342144: {2:46838:2} Registered PE standby with CSS. I AM A STANDBY MASTER.

3> Check ocssd logs from various nodes.

cat ocssd.trc |grep MASTER

2017-06-17 17:30:54.010 :    CSSD:1971631872: clssgmOptagProcessGrockCreate: grock CLSN.ONSNETPROC.MASTER from node node1, number 1, with 1 attributes having size 20
2017-06-17 17:30:54.010 :    CSSD:1971631872: clssgmGenSetGrockAttr: grock CLSN.ONSNETPROC.MASTER, attribute MAXMBRNUM, type 7, length 4, value (512/512/0x200)
2017-06-17 17:30:54.010 :    CSSD:1971631872: clssgmGroupAttrPrint: Attributes for group CLSN.ONSNETPROC.MASTER, ID 32:2
2017-06-17 17:30:54.010 :    CSSD:1971631872: clssgmsCreateMember: Created memberID 32:2:1 in group CLSN.ONSNETPROC.MASTER with event subscriptions 0x000000a1, flags 0x0 for clientID 1:76:18

What will happen if the Master Node is down.

very obious question, if the master node is down what will happen ? Does OCR will not be backed up?


When OCR master (crsd.bin process) stops or restarts for whatever reason, the crsd.bin on surviving node with lowest node number will become new OCR master.

Just to proof the same I restarted the Node1 which is my current master node and checked the logfile and did a Manual OCR backup too and you can see the result below


2017-06-18 00:17:15.398 :   CRSPE:1121937152: {2:46838:561} PE Role|State Update: old role [SLAVE] new [MASTER]; old state [Running] new [Configuring]
2017-06-18 00:17:15.398 :   CRSPE:1121937152: {2:46838:561} PE MASTER NAME: node2
2017-06-18 00:17:15.403 :  OCRMAS:1748141824: th_master:13: I AM THE NEW OCR MASTER at incar 7. Node Number 2
2017-06-18 00:17:15.407 :  OCRSRV:1128240896: proas_amiwriter: ctx is MASTER CHANGING/CONNECTING
2017-06-18 00:17:16.304 :   CRSPE:1121937152: {2:46838:561} PE Role|State Update: old role [MASTER] new [MASTER]; old state [Configuring] new [Starting]
2017-06-18 00:17:16.311 :   CRSPE:1121937152: {2:46838:561} PE Role|State Update: old role [MASTER] new [MASTER]; old state [Starting] new [Running]

lets do a Manual OCR backup and see whats Happening

[root@node1 oracle]# ocrconfig -manualbackup

node2     2017/06/18 00:23:47     +DATA_MGMT:/RAC01/OCRBACKUP/backup_20170618_002347.ocr.284.946945427     0


As you can see, although I executed the backup from node1, its node2 who took the backup


The easiest Way to Identify the Master Node in  Oracle 12.2


and finially the easiest way. Works perfectly with 12c. Not Aware of about other versions

oclumon manage -get MASTER

Master = node2


How to Find the Cluster Log Files in Oracle 12.2

Location of Cluster Logfiles in 12.2


today I just expierenced that the logfiles are no more available under $CRS_HOME/log/node_name Directory.
I must look the clusterware logs to investigate a serious issue which I just produced in my test Environment

Guess how  I manage to locate them

Very fist Thing which I noticed is  Clusterware log files are now termed as TRACE files and ends with .trc except alert.log (which is no more alertnode.log but just alert.log) file.

The Location of the logs are now $ADR_BASE/diag/crs/`hostname`/cr.

you can find it as Shown below

adrci> SHOW LOG
Choose the home from which to view diagnostic logs:
1: diag/rdbms/_mgmtdb/-MGMTDB
2: diag/asm/+asm/+ASM1
3: diag/crs/node1/crs
4: diag/clients/user_oracle/host_1268558819_107
5: diag/tnslsnr/node1/asmnet1lsnr_asm
6: diag/tnslsnr/node1/listener_scan1
7: diag/tnslsnr/node1/listener_scan2
8: diag/tnslsnr/node1/listener_scan3
9: diag/tnslsnr/node1/listener
10: diag/tnslsnr/node1/mgmtlsnr
Q: to quit


What is Oracle Flex Cluster

Oracle Flex Cluster Explained


What is Oracle Flex Cluster


Oracle 12c Flex Clusters use hub-and-spoke technology, allowing the cluster to scale much beyond the pre-12c clusters as it requires.

Maximum 64 hub nodes
can be as many as leaf nodes
Hub nodes are connected to storage.
Leaf nodes do not require to be directly connected to storage They access the data through hub nodes
Flex cluter may operate with one or many hub nodes but leaf nodes are optional and can only exists as member of cluster that includes atleat one hub node

What is hub Node in Flex Cluster


A hube node is same as pre 12 cluster node. Each hub node are tightly connected to each other via private interconnect and form the cluster
A hub node hosts database and ASM instances
Each hub node access the shared storage


What is Leaf Node in Flex Cluster


leaf nodes are loosely connected with the cluster.
Each leaf node is connected to the hub node and therefore connected to cluster via hub node only
leaf nodes are not connected to each other
They can not host database and ASM instances
All Leaf Nodes are on the same public and private network as the Hub Nodes
Leaf Nodes can failover to a different node if the Leaf Node fails.
Leaf Nodes can host different types of applications e.g. Fusion Middleware, EBS, IDM, etc. The applications on

What happens with the Leaf nodes connected to a Hub Node if the Hub Node is no more in Cluster
 Leaf Nodes associated with that Hub Node failover to one of the surviving nodes in the cluster.


How to identify a Leaf and Hub Node


$ crsctl get node role status -all
Node 'node1' active role is 'hub'
Node 'node2' active role is 'hub'


Benefits of using a cluster


Scalability of applications (including Oracle RAC and Oracle RAC One databases)
.Overview of Oracle Clusterware
• Reduce total cost of ownership for the infrastructure by providing a scalable system with low-cost commodity hardware
• Ability to fail over
• Increase throughput on demand for cluster-aware applications, by adding servers to a cluster to increase cluster resources
• Increase throughput for cluster-aware applications by enabling the applications to run on all of the nodes in a cluster
• Ability to program the startup of applications in a planned order that ensures dependent processes are started in the correct sequence
• Ability to monitor processes and restart them if they stop
• Eliminate unplanned downtime due to hardware or software malfunctions
• Reduce or eliminate planned downtime for software maintenance

Use of crsctl check command

Help page to see usages of crsctl check


#crsctl check -h

Check status of OHAS and CRS stack

# crsctl check crs
CRS-4638: Oracle High Availability Services is online
CRS-4537: Cluster Ready Services is online
CRS-4529: Cluster Synchronization Services is online
CRS-4533: Event Manager is online


Check status of CRS stack


# crsctl check cluster -all

**************************************************************
node1:
CRS-4537: Cluster Ready Services is online
CRS-4529: Cluster Synchronization Services is online
CRS-4533: Event Manager is online
**************************************************************
node2:
CRS-4537: Cluster Ready Services is online
CRS-4529: Cluster Synchronization Services is online
CRS-4533: Event Manager is online
**************************************************************

# crsctl check cluster -n node1

**************************************************************
node1:
CRS-4537: Cluster Ready Services is online
CRS-4529: Cluster Synchronization Services is online
CRS-4533: Event Manager is online
*************************************************************

Check status of Cluster Time Synchronization Services

#   crsctl check ctss

CRS-4700: The Cluster Time Synchronization Service is in Observer mode.

Check status of resources

crsctl check resource { [...]|-w } [-n ] [-k ] [-d ]

Check status of resource Groups

#crsctl check css

CRS-4529: Cluster Synchronization Services is online

Check status of Event Manager

# crsctl check evm

CRS-4533: Event Manager is online


Step by Step Oracle 12c R2 (12.2.0.1) RAC installation on Oracle VirtualBox with OEL7


How to Install Oracle RAC 12.2.0.1 on Your Laptop

Step1:

Requirements To Install Oracle 12c RAC.


To Complete this workshop you must coply with following minimum requirements
Hardware Requirements

We need 4 Servers as mentioned below
Minimum 2 Servers each with following Configurations

                              1 CPU (i7 or i7)
                              4 GB RAM (more RAM is better)
                              2 NIC
                              50 GB HDD minimum per node                       

1 Server for Storage with following configuration
                              1 CPU (i7 or i7)
                              2 GB RAM (more RAM is better)
                              1 NIC

1 Server for DNS/NTP etc

                              1 CPU (i7 or i7)
                              2 GB RAM (more RAM is better)
                              1 NIC

If you want you can bypass using DNS/NTP and in that case you dont Need 4th Server                           

Software Requirements for Oracle RAC Installation


Oracle Linux 7 (Use the latest spin eg. 7.3)
VirtualBox (5.1.14)
Oracle 12c Release 2 (12.2.0.1) Software (64 bit)


IP Requirements for Oracle RAC Installation


7 set of  IP addresses (in public IP range) for the purpose as described below
               1 Public IP for each node (2 node x 1= 2 IPs)
               1 Public IP for each node for VIP  (2 node x 1= 2 IPs)
               3 IPs for SCAN
               2 set of IPs (in Private network range) 1 IP per node for interconnect

Additionally you need 2 more public IPs to complete this workshop (1 for storage machine and 1 for DNS machine)

Here find an a short look how I have used the IP addresses
# Public

192.9.1.100   node1.oracle.com        node1
192.9.1.101   node2.oracle.com        node2
192.9.1.102   dns.oracle.com          dns
192.9.1.105   storage.oracle.com      storage

# Private
10.0.0.1   node1-priv.oracle.com   node1-priv
10.0.0.2   node2-priv.oracle.com   node2-priv

# Virtual IP

192.9.1.150   node1-vip.oracle.com        node1-vip
192.9.1.151   node2-vip.oracle.com        node2-vip

#SCAN
192.9.1.150                       scan.oracle.com                                            scan
192.9.1.151                       scan.oracle.com                                            scan
192.9.1.152                       scan.oracle.com                                            scan

Step2:

How to Download Oracle VirtualBox, OEL7 and Database Software


Click Here to see step by step instruction how to download the required Softwares

Step3:

How to Create New Virtual Machine

Create and Configure the VM as per the above given requirement

Click Here to see the step by step instruction

Step4:

How to Install Oracle Enterprise Linux (OEL 7) on VirtualBox.

Click Here for step by step documentation and  complete the OEL 7 (OS) Installation

Perform the installation on all 3 Servers. 2 for RAC nodes and 1 for DNS and NTP

Step5:

How to Perform Openfiler Installation

Click Here to find the step by step instruction

Step6:

Configure Openfiler and Discover the LUN on RAC nodes


Click Here to find step by step instruction

Step7:

How to Configure NTP.

Click Here to find how to Configure NTP

If you dont want to use NTP just deconfigure it and let the clusterware (CTSS) takecare of time synchronization

Step8: ( Either Step7 or Step 8 )

How to Deconfigure NTP


systemctl stop ntpd.service
systemctl status ntpd.service

 mv /etc/ntp.conf /etc/ntp.conf.org
 rm /var/run/ntpd.pid


Step9:


How to Configure DNS


Click Here to find step by step how to configure DNS


Step10:

Create Oracle Software owner Group and User

Perform below Steps on On Both Nodes (node1 and node2)

 A: Add group and user

Add oinstall and dba group
groupadd -g 500 oinstall
groupadd -g 501 dba

Add oracle user
   useradd -u 500 -g oinstall -G dba oracle
   Reset Password for user oracle
   passwd Oracle

 B : Create the directories and change ownship to Oracle
    mkdir -p  /u01/app/12.2.0.2/grid
    mkdir -p /u01/app/oracle/product/12.2.0.2/dbp1
    chown -R oracle:oinstall /u01
    chmod -R 775 /u01/

 C:  Configure /etc/hosts 


#loopback address
127.0.0.1       localhost.localdomain   localhost

# Public

192.9.1.100   node1.oracle.com        node1
192.9.1.101   node2.oracle.com        node2
192.9.1.105   storage.oracle.com      storage

# Private
10.0.0.1   node1-priv.oracle.com   node1-priv
10.0.0.2   node2-priv.oracle.com   node2-priv

# Virtual
192.9.1.150   node1-vip.oracle.com        node1-vip
192.9.1.151   node2-vip.oracle.com        node2-vip

D: Disable SELINUX

If alredy not disabled this is the time you must either  disable SELINUX setting or change to permissive
Change the setting by editing the "/etc/selinux/config" file, making sure the SELINUX flag is set as follows

SELINUX=disable
E: Disable IPtables/firewall

If you have the Linux firewall enabled, you will need to disable or configure it, as shown here. The following is an example of disabling the firewall.
systemctl stop  iptables.service
chkconfig iptables off

  F:  Enable NTP Slewing Option

 The Option is only needed i´f you are using NTP for time synchronization
If your RAC is going to be permanently connected to your main network and you want to use NTP, you must add the "-x" option into the following line in the "/etc/sysconfig/ntpd" file.

OPTIONS="-x -u ntp:ntp -p /var/run/ntpd.pid"

Step11

Prepare ASM Disk for RAC Shared storage


You have installed and configured openfiler in Step 5 and Step6. The shared LUN  (/dev/sdb) from openfiler is discoverd on your RAC node.
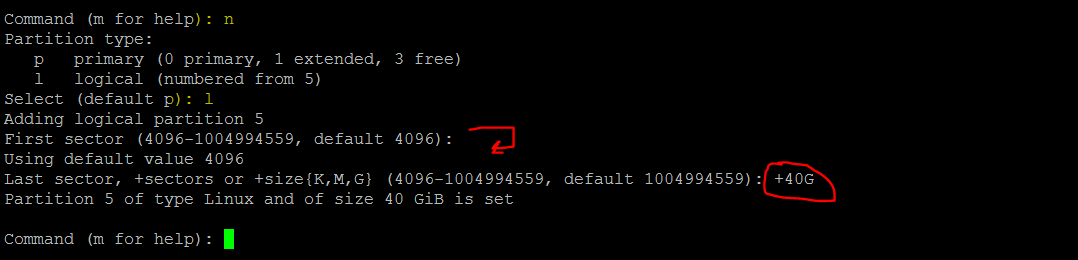
Create minimum 8 Partitions each 40GB in size as shown below. Use fdisk to create partitions
You can do this as root user and you must do it only on one node.


Step12:
Discover the partition on Node2:

Just execute the following command to sync the partiton table on node2 as well
Login as root

partprobe

fdisk –l  to see if the partitions are visible

Step13:
Create ASM disk using ASM Lib
For step by step instruction how to install, configure and use ASM Lib Click Here

Step14:

Configure user quibalance for oracle user
Or
Configure ssh for oracle user.

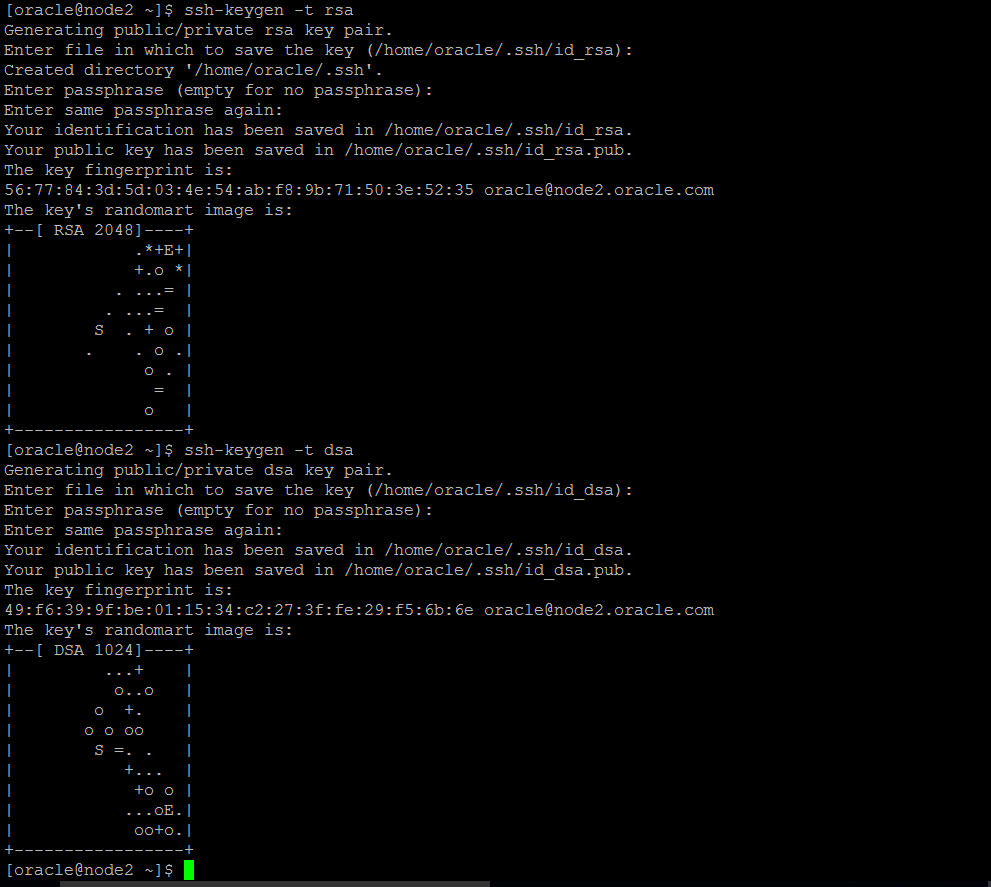
On node1:- $ssh-keygen –t rsa
                      $ssh-keygen –t dsa

On node2:- $ssh-keygen –t rsa
                      $ssh-keygen –t dsa

On node1:- $cd /home/oracle/.ssh
                        $cat *.pub>>node1

On node2:- $cd /home/oracle/.ssh
                         $cat *.pub>>node2

On node1:- $scp node1 node2:/home/oracle/.ssh
On node2:- $scp node2 node1:/home/oracle/.ssh

On node1:- $cat node*>>authorized_keys
On node2:- $cat node*>>authorized_keys

Now test the ssh configuration, should work without Password
On node1

ssh node1
ssh node2

On Node2
ssh node2
ssh node1


Step15:

Install RPMs
Install following required RPMs (same or above version) on both the nodes (node1, node2)
binutils-2.23.52.0.1
compat-libcap1-1.10
libgcc-4.8.2
libstdc++-4.8.2
libstdc++-devel-4.8.2
sysstat-10.1.5
ksh
make-3.82
glibc-2.17
glibc-devel-2.17
libaio-0.3.109
libaio-devel-0.3.109
nfs-utils-1.2.3-15
smartmontools-6.2-4
net-tools-2.0-0.17
cvuqdisk-1.0.10-1
cvuqdisk-1.0.10-1.rpm is located under /u01/stage/database/rpm/ (location where you have extracted your grid binaries)

Step16:
Configure Kernal Parameters
Configure Following Kernal  parameter on both nodes (Node1 and Node2)
Set Kernel Parameters (/etc/sysctl.conf)

fs.file-max = 6815744
kernel.sem = 250 32000 100 128
kernel.shmmni = 4096
kernel.shmall = 1073741824
kernel.shmmax = 4398046511104
kernel.panic_on_oops = 1
net.core.rmem_default = 262144
net.core.rmem_max = 4194304
net.core.wmem_default = 262144
net.core.wmem_max = 1048576
net.ipv4.conf.all.rp_filter = 2
net.ipv4.conf.default.rp_filter = 2
fs.aio-max-nr = 1048576
net.ipv4.ip_local_port_range = 9000 65500

# sysctl –p
Configure /etc/security/limits.conf file
oracle   soft   nofile    1024
oracle   hard   nofile    65536
oracle   soft   nproc    16384
oracle   hard   nproc    16384
oracle   soft   stack    10240
oracle   hard   stack    32768
oracle   hard   memlock    134217728
oracle   soft   memlock    134217728

Configure /etc/pam.d/login file
               session   required     /lib/security/pam_limits.so

Step17:
Copy and Unzip Software
Transfer the oracle software and unzip grid software to $GRID_HOME
Since I want to install grid software under /u01/app/12.2.0.2/grid. I must unzip grid software on this location.

Run cluster verification utility to perform the installation precheck
cd under /u01/app/12.2.0.2/grid

./runcluvfy.sh stage -pre crsinst -n node1,node2 -fixup -verbose
Fix any error /warnning reported by runcluvfy. It is highly advisble not to ignore a single warnning if you dont know the consequence

To fix Most common Issues just Click Here

Step18:

Login as Oracle user and execute gridSetup.sh from /u01/app/12.2.0.2/grid

./gridSetup.sh

Step19:

Follow the installer instruction as Shown below.

Choose Configure Oracle Grid Infrastructure for a New Cluster and click next


select configure an Oracle standalone Cluster and click next


 Enter Cluster Name, Scan Name and Port and click Next


Click on Add button and add the 2nd Server


Click on SSH Connectivity

 if you have already configured ssh you can test ssh configuration by clicking test button

to Setup the ssh you can click on Setup button

Click Next to proceed


Check if the proper Interface is selected. You  can Change the Default listing from drop down list.

Click Next


Click Next


Click Next


Enter the disk Group Name.
if your disk is not listed here
       
         Check if the disk discovery path is correct.Change if required
         Check if the permission of the disk is correct


Select appropriate disks and click Next


Enter the diskgroup Name to house the GMIR and click Next


Specify the Password and and Click Next


Click Next


Click Next.


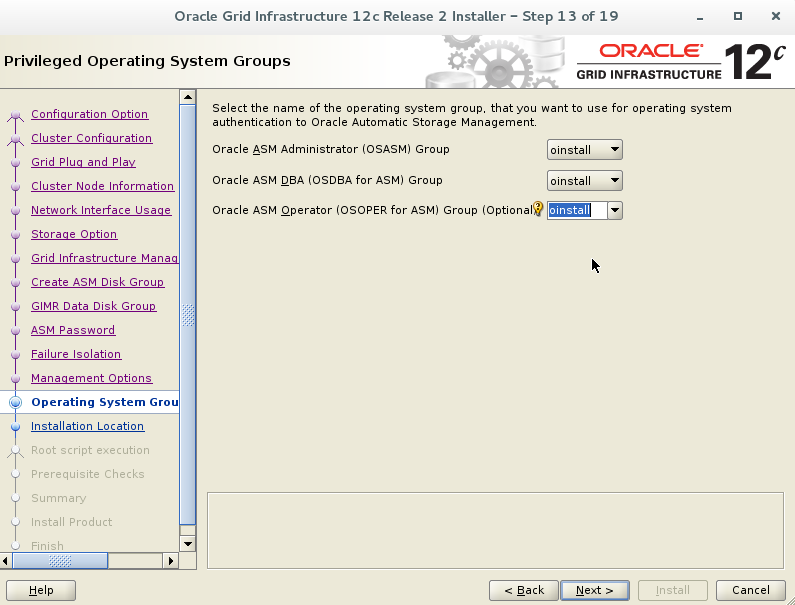
Choose the Groups accordingly and click Next


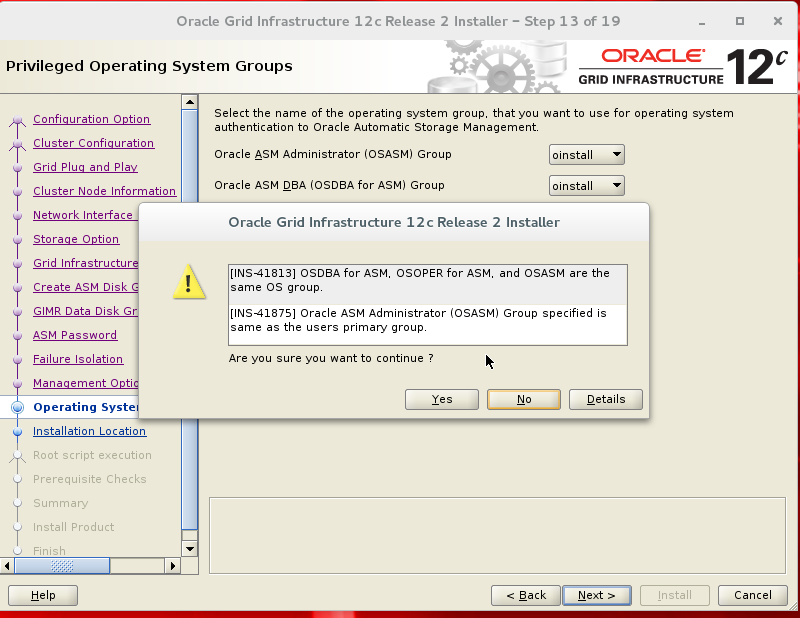
Click Yes to ignore the warnning and click Next to continue


Enter Oracle base Directory and click Next


Click Next


Click Next


Click Install to start the Installation


Execute the scripts. Ensure to execute serially exactly in the order listed below

On Node1

/u01/app/oraInventory/orainstRoot.sh

On Node2

/u01/app/oraInventory/orainstRoot.sh

On Node1

/u01/app/12.2.0.2/grid/root.sh

wait to finish the root.sh on node1.

On Node2:

/u01/app/12.2.0.2/grid/root.sh

Click ok only once the script execution on both the nodes are completed successfully


Check the Status of clusterware


Install Oracle Database Software  12cR2 RAC

Click Here

Create Oracle Database 12cR2 RAC


Click Here