Showing posts with label Database Administration. Show all posts

What is Oracle Flashback Technologies

Understanding Oracle Flashback Technologies


What is oracle Flashback Technologies?


The Flashback features offer the capability to query historical data, perform change analysis, and perform self-service repair to recover from logical corruptions while the database is online. With Oracle Flashback Technology, you can indeed undo the past.

How to Enable Flashback?


Flashback was introduced in 10g and up to 11gR1 you need to clean mount the database to enable the
flashback. It means you need downtime to enable the flashback

before 11gR2

login as sysdba

SQL> SHUTDOWN IMMEDIATE;

SQL> STARTUP MOUNT EXCLUSIVE;

SQL> ALTER SYSTEM SET DB_FLASHBACK_RETENTION_TARGET=2880 SCOPE=BOTH;  << for how long the flashback logs are retained

SQL> ALTER SYSTEM SET DB_RECOVERY_FILE_DEST_SIZE=50G SCOPE=BOTH;   << maximum limit on size flashback log can use in DB_RECOVERY_FILE_DEST location

SQL> ALTER SYSTEM SET DB_RECOVERY_FILE_DEST=/ora_data01/orcl/recovery/;  << location where the flashback logs are written

SQL> ALTER DATABASE FALSHBACK ON;

SQL> ALTER DATABASE OPEN;

11gR2 and after

SQL> ALTER SYSTEM SET DB_FLASHBACK_RETENTION_TARGET=2880 SCOPE=BOTH;  << for how long the flashback logs are retained

SQL> ALTER SYSTEM SET DB_RECOVERY_FILE_DEST_SIZE=50G SCOPE=BOTH;   << maximum limit on size flashback log can use in DB_RECOVERY_FILE_DEST location

SQL> ALTER SYSTEM SET DB_RECOVERY_FILE_DEST=/ora_data01/orcl/recovery/;  << location where the flashback logs are written

SQL> ALTER DATABASE FALSHBACK ON;

SQL> ALTER DATABASE OPEN;

Notice the difference. starting from 11gR2 you dont need to shutdown your database to enable the flashback

How to Check if the FALSHBACK is enabled?


SQL> select flashback_on from v$database;

Which background process is responsible for flashback logs writing?

RVWR (Recovery Writer, a.k.a Flashback Writer) was introduced in Oracle 10g to write flashback data from the Flashback Buffer in the SGA to the flashback database logs on disk.

What is Flashback Buffer?


flashback buffer is a designated area in SGA (just like log buffer) to hold the flashback logs. RVWR process flush the log from flashback buffer to disk

When are the flashback logs deleted?


  • If the flash recovery area has enough space, then a flashback log is deleted whenever necessary to satisfy the flashback retention target.
  • If a flashback log is old enough that it is no longer needed to satisfy the flashback retention target, then a flashback log is overwritten.
  • If the database must create a new flashback log and the fast recovery area is full or there is no disk space, then the oldest flashback log is overwritten instead.
  • If the fast recovery area is full, then an archived redo log that is reclaimable according to the FRA rules may be automatically deleted by the fast recovery area to make space for other files. In this case, any flashback logs that would require the use of that redo log file for the use of FLASHBACK DATABASE are also deleted.
  • No file in the fast recovery area is eligible for deletion if it is required to satisfy a guaranteed restore point. Thus, retention of flashback logs and other files required to satisfy the guaranteed restore point, in addition to files required to satisfy the backup retention policy, can cause the fast recovery area to fill completely.
  • When flashback mode is turned off all flashback logs are deleted ONLY if there’s no guaranteed restore points. If there’s at least one guaranteed restore point, no flashback logs are deleted.
  • When the oldest guaranteed restore point is deleted and flashback mode is off, all flashback logs older than the second oldest guaranteed restore point are deleted. If flashback mode is on for the database OR the guaranteed restore point is not the oldest no flashback logs are deleted.

What feature Flashback technology offers?

Enabling flashback offers following featuers

Flashback Database: restore the entire database to a specific point-in-time, using Oracle-optimized flashback logs, rather than via backups and forward recovery.

Flashback Table: easily recover tables to a specific point-in-time, useful when a logical corruption is limited to one or a set of tables instead of the entire database.

Flashback Drop: recover an accidentally dropped table. It restores the dropped table, and all of its indexes, constraints, and triggers, from the Recycle Bin (a logical container of all dropped objects).

Flashback Transaction: undo the effects of a single transaction, and optionally, all of its dependent transactions. via a single PL/SQL operation or by using an Enterprise Manager wizard.

Flashback Transaction Query:  see all the changes made by a specific transaction, useful when an erroneous transaction changed data in multiple rows or tables.

Flashback Query: query any data at some point-in-time in the past. This powerful feature can be used to view and logically reconstruct corrupted data that may have been deleted or changed inadvertently.

Flashback Versions Query: retrieve different versions of a row across a specified time interval instead of a single point-in-time.

Total Recall: efficiently manage and query long-term historical data. Total Recall automatically tracks every single change made to the data stored inside the database and maintains a secure, efficient and easily accessible archive of historical data.

FRA and Flashback Queries

To find Location, quota, in use/reclaimable space, number of files

SQL>SELECT * FROM v$recovery_file_dest;

For each file type, percent of FRA space it uses and is reclaimable and number of files of that type

SQL>SELECT * FROM v$recovery_area_usage;

Estimated space used by Flashbacklogs

SQL>SELECT estimated_flashback_size FROM v$flashback_database_log;


List Oracle patches Applied in Database and Usages of DBMS_QOPATCH

How can I list all of the patches that I have applied

Run opatch lsinventory from $ORACLE_HOME/OPatch to check the patches applied

$opatch lsinventory
or

$opatch lsinventory -display
or

$opatch lsinventory -details

Execute below command directly in the database as dba to check the list of patches registered in the database


SQL> select * from sys.registry$history;

for 12c


SQL> select * from sys.dba_registry_sqlpatch

from 12c onwards you can even use dbms_qopatch package

SQL> set serverout on;
SQL> exec dbms_qopatch.get_sqlpatch_status;
SQL> select dbms_qopatch.GET_OPATCH_LIST from dual;

Query for any  specific patch that has been applied?

SQL> select xmltransform(dbms_qopatch.is_patch_installed('21359755'), dbms_qopatch.get_opatch_xslt) "Patch installed?" from dual;

Patch installed?
-------------------------------------------------------
Patch Information:
         21359755:   applied on 2015-10-21T23:48:17Z


All you can do with DBMS_QOPATCH package

SQL>  desc dbms_qopatch


FUNCTION ADD_OINV_JOB RETURNS BOOLEAN
 Argument Name                  Type                    In/Out Default?
 ------------------------------ ----------------------- ------ --------
 NNAME                          VARCHAR2                IN
 INAME                          VARCHAR2                IN


PROCEDURE CONFIG_OINV_JOBS

FUNCTION DROP_OINV_JOB RETURNS BOOLEAN
 Argument Name                  Type                    In/Out Default?
 ------------------------------ ----------------------- ------ --------
 NNAME                          VARCHAR2                IN
 INAME                          VARCHAR2                IN

FUNCTION GET_OPATCH_BUGS RETURNS XMLTYPE
 Argument Name                  Type                    In/Out Default?
 ------------------------------ ----------------------- ------ --------
 PNUM                           VARCHAR2                IN     DEFAULT

FUNCTION GET_OPATCH_COUNT RETURNS XMLTYPE

FUNCTION GET_OPATCH_DATA RETURNS XMLTYPE
 Argument Name                  Type                    In/Out Default?
 ------------------------------ ----------------------- ------ --------
 PNUM                           VARCHAR2                IN


FUNCTION GET_OPATCH_FILES RETURNS XMLTYPE
 Argument Name                  Type                    In/Out Default?
 ------------------------------ ----------------------- ------ --------
 PNUM                           VARCHAR2                IN

FUNCTION GET_OPATCH_INSTALL_INFO RETURNS XMLTYPE

FUNCTION GET_OPATCH_LIST RETURNS XMLTYPE

FUNCTION GET_OPATCH_LSINVENTORY RETURNS XMLTYPE

FUNCTION GET_OPATCH_OLAYS RETURNS XMLTYPE Argument Name                  Type                    In/Out Default?
 ------------------------------ ----------------------- ------ --------
 PNUM                           VARCHAR2                IN

FUNCTION GET_OPATCH_PREQS RETURNS XMLTYPE
 Argument Name                  Type                    In/Out Default?
 ------------------------------ ----------------------- ------ --------
 PNUM                           VARCHAR2                IN


FUNCTION GET_OPATCH_XSLT RETURNS XMLTYPE

FUNCTION GET_PENDING_ACTIVITY RETURNS XMLTYPE

PROCEDURE GET_SQLPATCH_STATUS

 Argument Name                  Type                    In/Out Default?
 ------------------------------ ----------------------- ------ --------
 PNUM                           VARCHAR2                IN     DEFAULT

FUNCTION IS_PATCH_INSTALLED RETURNS XMLTYPE
 Argument Name                  Type                    In/Out Default?
 ------------------------------ ----------------------- ------ --------
 PNUM                           VARCHAR2                IN

PROCEDURE OPATCH_INV_REFRESH_JOB

PROCEDURE OPATCH_RUN_JOB

FUNCTION PATCH_CONFLICT_DETECTION RETURNS XMLTYPE
 Argument Name                  Type                    In/Out Default?
 ------------------------------ ----------------------- ------ --------
 FILENAME                       VARCHAR2                IN

PROCEDURE REFRESH_OPATCH_DATA

PROCEDURE REPLACE_DIRS_INT
 Argument Name                  Type                    In/Out Default?
 ------------------------------ ----------------------- ------ --------
 PF_ID                          NUMBER                  IN

PROCEDURE REPLACE_LOGSCRPT_DIRS

PROCEDURE SET_CURRENT_OPINST
 Argument Name                  Type                    In/Out Default?
 ------------------------------ ----------------------- ------ --------
 NODE_NAME                      VARCHAR2                IN     DEFAULT
 INST_NAME                      VARCHAR2                IN     DEFAULT

PROCEDURE SET_DEBUG
 Argument Name                  Type                    In/Out Default?
 ------------------------------ ----------------------- ------ --------
 DEBUG                          BOOLEAN                 IN

PROCEDURE SKIP_SANITY_CHECK
 Argument Name                  Type                    In/Out Default?
 ------------------------------ ----------------------- ------ --------
 SKIP
                           BOOLEAN                 IN

How to find indexes that are not in use on Oracle

Finding unused indexes on Oracle

Many times we are in need to find out or provide the list of Indexes that are used/not  used so that we can come to a decision whether to keep them or to drop them

Here is a quick way how you can enable monitoring for Index usages and query dba_object_usage or v$object_usage view later to see how frequently the indexes are being used. Starting from 12c v$object_usage view is depricated and therefore I recommend to use dba_object_usage


How to Enable Monitoring on Index Usages

alter index   monitoring usage;
SQL> alter index idx1  monitoring usage; 

How to Find the Index Usages


select index_name, table_name, used from v$object_usage;

or

select index_name, table_name, used from dba_object_usage;

How to disable Monitoring on Index Usages


alter index nomonitoring usage;
SQL> alter index  idx1 nomonitoring usage;


How to generate script to enable Index monitoring for all Indexes owned by an User


SET PAGESIZE 0
SET FEEDBACK OFF
SET VERIFY OFF

SPOOL enable_index_usages_monitoring.sql
SELECT 'ALTER INDEX "' || i.owner || '"."' || i.index_name || '" MONITORING USAGE;'
FROM   dba_indexes i
WHERE  owner      = UPPER('&OWNER')
SPOOL OFF

SET PAGESIZE 18
SET FEEDBACK ON

To enable Monitoring you can simply execute the scipt as shown below

SQL>@enable_index_usages_monitoring.sql


Oracle Database Profile Management

All About Oracle Database Profile


What is a Profile in Oracle Database

The purpose of a profile in oracle database is basically to limit the use of resouce for a particular user.
When you create a profile you define a set of limits on database resources. If you assign the profile to a user, then that user cannot exceed these limits.

How to create Profile in Oracle

SQL> CREATE PROFILE MyFirstProfile LIMIT PASSWORD_REUSE_MAX 10 PASSWORD_REUSE_TIME 30;

How to assign Profile to a user in Oracle


You can assign a profile to a user at the time of creating the user and you can alter user to assign the profile for an existing user

SQL> create user andy identified by password profile MyFirstProfile;

or

SQL> ALTER USER andy PROFILE MyFirstProfile;

How to find Profiles assiged to an user in Oracle


SQL> select username,profile from dba_users

UserName                Profile
ORACLE_OCM      DEFAULT
OJVMSYS               DEFAULT
SYSKM                   DEFAULT
XS$NULL               DEFAULT
GSMCATUSER      DEFAULT

How to find the list of Profiles created in the Database

SQL> select profile , common from dba_profiles

PROFILE                       COMMON
C##WDUSERS               YES
C##SYSPROFILE           YES
C##OEM_PROFILE        YES
C##APPUSER                  YES
ORA_STIG_PROFILE      NO

Note:- If you are running oracle database Version 12c, it got a feature of multitenancy where in you have multiple pluggable databases running in container. COMMON=Yes means the profile is common for all availiable databases while COMMON=NO means the profile is specific to only the Pluggable database for which it has been created and can not be used beyond this scope.

How to find the contents of a Profile

SQL> select * from dba_profiles where profile='DEFAULT'

PROFILE   RESOURCE_NAME                            RESOURCE_TYPE   LIMIT         OMMON
DEFAULT   COMPOSITE_LIMIT                            KERNEL                      UNLIMITED NO
DEFAULT   SESSIONS_PER_USER                        KERNEL                      UNLIMITED NO
DEFAULT   CPU_PER_SESSION                            KERNEL                        UNLIMITED NO
DEFAULT   CPU_PER_CALL                                 KERNEL                        UNLIMITED NO
DEFAULT   LOGICAL_READS_PER_SESSION   KERNEL                        UNLIMITED NO
DEFAULT   LOGICAL_READS_PER_CALL         KERNEL                        UNLIMITED NO
DEFAULT   IDLE_TIME                                          KERNEL                         UNLIMITED NO
DEFAULT   CONNECT_TIME                                KERNEL                         UNLIMITED NO
DEFAULT   PRIVATE_SGA                                   KERNEL                           UNLIMITED NO
DEFAULT   FAILED_LOGIN_ATTEMPTS           PASSWORD                       10                 NO
DEFAULT   PASSWORD_LIFE_TIME                  PASSWORD                       180                NO
DEFAULT   PASSWORD_REUSE_TIME              PASSWORD                       UNLIMITED NO
DEFAULT   PASSWORD_REUSE_MAX              PASSWORD                       UNLIMITED NO
DEFAULT   PASSWORD_VERIFY_FUNCTION   PASSWORD                             NULL    NO
DEFAULT   PASSWORD_LOCK_TIME                 PASSWORD                                1         NO
DEFAULT   PASSWORD_GRACE_TIME                PASSWORD                           7              NO


How to modify a Profile


SQL> ALTER PROFILE MyFirstProfile LIMIT PASSWORD_REUSE_TIME 90 PASSWORD_REUSE_MAX UNLIMITED;

How to delete a Profile

SQL> DROP PROFILE MyFirstProfile CASCADE;


ORA-1652: unable to extend temp segment by 128 in tablespace TEMP

ORA-1652: unable to extend temp segment


Error


ADR Home = /u01/app/oracle/diag/rdbms/orcl/orcl1p:
*************************************************************************
2017-09-06 08:39:08.701000 +02:00
ORA-1652: unable to extend temp segment by 128 in tablespace TEMP [CITI]

Solution


You can resize the tempfile if it is restricted to limited size

SQL> alter database tempfile '/u01/app/oradata/temp01.dbf' resize 10240M

You can now configure the tempfile to grow up to certain size or up the maximum size allowed by oracle (32G)
 SQL> alter database tempfile '/u01/app/oradata/temp01.dbf'  autoextend on next 100m maxsize 20480;
or
SQL> alter database tempfile '/u01/app/oradata/temp01.dbf'  autoextend on next 100m maxsize unlimited;

If your tempfile already reached to maximum allowed file size limit then you must add new tempfile

Add tempfile in your temp tablespace to allow the TEMP tablespace to grow further

SQL> alter tablespace temp add tempfile   '/u01/app/oradata/temp02.dbf' size 10240M reuse autoextend on next 100m maxsize  unlimited;


ORA-03113: end-of-file on communication channel

How do I fix this ORA-03113 error?

I executed oerr Utility and here is the Output

$oerr ora 03113

ORA-03113: end-of-file on communication channel

Cause: The connection between Client and Server process was broken.

Action: There was a communication error that requires further investigation.  

So as you can see from Action it is clearly pointing that it is a communication error which requires further Investigation

I will give you here some importent tip which will help you to solve this issue

open the database alertlog and look for any additional error message. Rosolving the additional Problem apearing in the alertlog will resolve this issue.

There could be several possible reasons of ORA-03113

  • Server machine crashed
  • Oracle internal Errors
  • Flash recover area is full
  • Process has been aborted
  • Session has been killed
  • Client incorrectly handling multiple Connections
  • Network related issues
  • Oracle Database is crashed or crashing while starting
    etc.etc.etc...

As you can see the list is quite Long and therefore to successfully troubleshoot the issue you must look into the database logfile and/or tracefile and try to grap the additional error message which is causing ORA-03113.

If you have any question or you are struggeling with ORA-03113 leave me your message/comment in comment box below. I will feel houner to assist you to resolve your queries/issues


Oracle Database Listener an Overview

Oracle Listener


What is an Oracle Listener?


The listener is a process that runs on the database server . It receives incoming client connection requests and manages the traffic of these requests to the database server. One Listener can listen incoming Client request for more than one database.

Where is the Listener Configuration file Stored?

Oracle Listener configuration file is always located in ORACLE_HOME/network/admin Directory and named as listener.ora
where  ORACLE_HOME is the Location where you have Oracle Database binaries Installed.

How to Create Listener

Creating of Listener is really easy you just Need to put an Entry like below in your listener.ora file. If the file already does not exists just create it

Note:- use vi on Linux based Server or Notepad on Windows to edit the listener.ora file.

Sample listener.ora

LISTENER01 =
    (DESCRIPTION =
      (ADDRESS_LIST =
        (ADDRESS = (PROTOCOL = TCP)(HOST = node1.oracle.com)(PORT = 1521))
      )
    )

Optionally you can tell Listenr for what all database it must listen by entring the respective entries in below Format.

SID_LIST_LISTENER01 =
  (SID_LIST =
    (SID_DESC =
      (SID_NAME = DBNAME1)
      (ORACLE_HOME = /u01/app/oracle/product/11.2.0.4/db1)
    )
    (SID_DESC =
      (GLOBAL_DBNAME = DBNAME2.oracle.com)
      (ORACLE_HOME =/u01/app/oracle/product/11.2.0.4/db2)
      (SID_NAME = DBNAME2)
    )
  )

Oracle provides another GUI Methode to create Listener and the tool used here is called Oracle Network Configuration Assistence

on Linux based plateform you can invoke the Utility by entring below command, considering Oracle binaries are installed under /u01/app/oracle/product/11.2.0.4/db2

$export ORACLE_HOME==/u01/app/oracle/product/11.2.0.4/db2
$export PATH=$PATH:$ORACLE_HOME/bin
$netca

optionally you can nevigate under $ORACLE_HOME/bin and execute netca command from there

$ cd  /u01/app/oracle/product/11.2.0.4/db2/bin
$./netca

If you use NETCA (recommended) Methode to create the LISTENER it will not only just create the listener but also start it.

How to Start Listener in Oracle

$export ORACLE_HOME==/u01/app/oracle/product/11.2.0.4/db2
$export PATH=$PATH:$ORACLE_HOME/bin
$ lsnrctl start LISTENER01

How to Check the Staus of Listener in Oracle


$export ORACLE_HOME==/u01/app/oracle/product/11.2.0.4/db2
$export PATH=$PATH:$ORACLE_HOME/bin
$ lsnrctl Status LISTENER01

Where to find the Listener Log Oracle.

$ lsnrctl status LISTENER01
LSNRCTL for Linux: Version 12.2.0.1.0 - Production on 29-JUL-2017 15:10:56
Copyright (c) 1991, 2016, Oracle.  All rights reserved.
Connecting to (DESCRIPTION=(ADDRESS=(PROTOCOL=IPC)(KEY=LISTENER01)))
STATUS of the LISTENER
------------------------
Alias                     LISTENER01
Version                   TNSLSNR for Linux: Version 12.2.0.1.0 - Production
Start Date                29-JUL-2017 15:09:22
Uptime                    0 days 0 hr. 1 min. 34 sec
Trace Level               off
Security                  ON: Local OS Authentication
SNMP                      OFF
Listener Parameter File   /u01/app/12.2.0.2/grid/network/admin/listener.ora
Listener Log File         /u01/app/oracle/diag/tnslsnr/node2/listener01/alert/log.xml
Listening Endpoints Summary...
  (DESCRIPTION=(ADDRESS=(PROTOCOL=ipc)(KEY=LISTENER01)))
The listener supports no services
The command completed successfully


Oracle 12cR2 – How to Setup Oracle Wallets

Step by Step how to setup Oracle Wallet to avoid Keying in the Password or Saving the Password in an Script file


Are you really concerned about Security. Are you not willing to save the password in a file or not willing to key in as and when required.

Then you must read this blog until the end

Create directory to hold wallet

mkdir -p /u01/app/oracle/admin/wallet
Enter wallet information in your sqlnet.ora

WALLET_LOCATION =
   (SOURCE =
     (METHOD = FILE)
     (METHOD_DATA =
       (DIRECTORY = /u01/app/oracle/admin/wallets)
     )
   )
SQLNET.WALLET_OVERRIDE = TRUE
SSL_CLIENT_AUTHENTICATION = FALSE
SSL_VERSION = 0


Now, create the wallet and the credentials

$ mkstore -wrl /u01/app/oracle/admin/wallets -create

Oracle Secret Store Tool : Version 12.2.0.1.0
Copyright (c) 2004, 2016, Oracle and/or its affiliates. All rights reserved.
Enter password:
Enter password again:

$ mkstore -wrl /u01/app/oracle/admin/wallets -createCredential ORCL1 SYS

Oracle Secret Store Tool : Version 12.2.0.1.0
Copyright (c) 2004, 2016, Oracle and/or its affiliates. All rights reserved.
Your secret/Password is missing in the command line
Enter your secret/Password:
Re-enter your secret/Password:
Enter wallet password:

$ mkstore -wrl /u01/app/oracle/admin/wallets -listCredential

Oracle Secret Store Tool : Version 12.2.0.1.0
Copyright (c) 2004, 2016, Oracle and/or its affiliates. All rights reserved.
Enter wallet password:
List credential (index: connect_string username)
1: ORCL1 SYS

$ cd /u01/app/oracle/admin/wallets/
$ ls -l


-rw-------. 1 oracle oinstall 581 Jun 24 17:47 cwallet.sso
-rw-------. 1 oracle oinstall   0 Jun 24 17:43 cwallet.sso.lck
-rw-------. 1 oracle oinstall 536 Jun 24 17:47 ewallet.p12
-rw-------. 1 oracle oinstall   0 Jun 24 17:43 ewallet.p12.lck


sqlplus /@ORCL1 as sysdba

SQL*Plus: Release 12.2.0.1.0 Production on Sat Jun 24 18:20:54 2017
Copyright (c) 1982, 2016, Oracle.  All rights reserved.

Connected to:
Oracle Database 12c Enterprise Edition Release 12.2.0.1.0 - 64bit Production

SQL>

Did you change your Sys User password? Are you worried now about your Wallet?
No problem just update the wallet Password

mkstore -wrl /u01/app/oracle/admin/wallets -modifyCredential ORCL1 SYS

Hope you have enjoyed the post.

Please feel free to post your Questions/Comments/Suggestions. I would be happy to Answer your queries


ORA-12578: TNS:wallet open failed


ORA-12578: TNS:wallet open failed

Are you facing ORA-12578: TNS:wallet open failed. No Problem you are at right place then.

$ sqlplus /@ORCL1 as sysdba

SQL*Plus: Release 12.2.0.1.0 Production on Sat Jun 24 17:51:12 2017
Copyright (c) 1982, 2016, Oracle.  All rights reserved.
ERROR:
ORA-12578: TNS:wallet open failed

Easiest way to resolve the issue by changing WALLET_OVERRIDE = TRUE to FALSE in SQLNET.ORA

edit your sqlnet.ora file and modify SQLNET.WALLET_OVERRIDE parameter value from TRUE to FALSE.
Change this:
SQLNET.WALLET_OVERRIDE = TRUE

to this:
SQLNET.WALLET_OVERRIDE = FALSE

Try Again.

Hope this helps


ORA-44787: Service cannot be switched into

Hot Fix ORA-44787: Service cannot be switched into


SQL> alter session set container=GIMR_DSCREP_10;
ERROR:
ORA-44787: Service cannot be switched into.


Cause: The service did not exist in the new pluggable database or the service was not started in the pluggable database.

Action: Use a valid service name for the pluggable database or start the service in the pluggable database first.

The Easiest way to resolve this issue is,  Restart the PDB.

Note:- Please be Aware of the fact that restarting the PDB will lead to downtime of the PDB

SQL> alter pluggable database GIMR_DSCREP_10 close immediate;

Pluggable database altered.

SQL> alter pluggable database GIMR_DSCREP_10 open;
Pluggable database altered.

SQL> alter session set container=GIMR_DSCREP_10;
Session altered.

CRS-09118: Grid Infrastructure Management Repository connection error

How to Resolve CRS-09118: Grid Infrastructure Management Repository connection error 12cR2 RAC


crsctl query catlog
CRS-09118: Grid Infrastructure Management Repository connection error

The crsctl Utility is not able to comunicate with Management database

checking repository database configuration

$ srvctl config mgmtdb
Database unique name: _mgmtdb
Database name:
Oracle home:
Oracle user: oracle
Spfile: +DATA_MGMT/_MGMTDB/PARAMETERFILE/spfile.269.946921407
Password file:
Domain:
Start options: open
Stop options: immediate
Database role: PRIMARY
Management policy: AUTOMATIC
Type: Management
PDB name: GIMR_DSCREP_10
PDB service: GIMR_DSCREP_10

Cluster name: RAC01
Database instance: -MGMTDB

check if PDB service is registered with MGMTLSNR

lsnrctl status MGMTLSNR | grep -i GIMR_DSCREP_10

As you can see the Service is not registered with Listener

checking repository database for PDB service existance

Login in management database and execute following queries

$ export ORACLE_HOME=/u01/app/12.2.0.2/grid
$ export PATH=$PATH:$ORACLE_HOME/bin
$ export ORACLE_SID=-MGMTDB
$ sqlplus "/as sysdba"

SQL> show con_name

CON_NAME
------------------------------
CDB$ROOT
SQL>
SQL>
SQL> show pdbs
    CON_ID CON_NAME                       OPEN MODE  RESTRICTED
---------- ------------------------------ ---------- ----------
         2 PDB$SEED                       READ ONLY  NO
         3 GIMR_DSCREP_10                 MOUNTED

SQL> alter session set container=GIMR_DSCREP_10;
Session altered.
SQL> select name from dba_services;
NAME
----------------------------------------------------------------
gimr_dscrep_10

-- As you can see Service is Present

Let's start the Service

SQL> exec dbms_service.start_service('gimr_dscrep_10')

$ lsnrctl status MGMTLSNR | grep -i GIMR_DSCREP_10

Service "gimr_dscrep_10" has 1 instance(s).

Now the listener is listining for gimr_dscrep_10 Service and Connection is successfull


ORA-00905: missing keyword

How to fix ORA-00905: missing Keyword


ERROR at line 1:
ORA-00905: missing Keyword

Cause

You tried to execute a statement, but you missed a required Keyword

Resolution

Verify the Syntax correct the Errors and rerun it.

An example

QL>  create diskgroup DATA normal redundency FAILGROUP FG1 disk '/dev/oracleasm/disks/DISK5' FAILGROUP FG2 '/dev/oracleasm/disks/DISK6';

 create diskgroup DATA normal redundency FAILGROUP FG1 disk '/dev/oracleasm/disks/DISK5' FAILGROUP FG2 '/dev/oracleasm/disks/DISK6'
                              *
ERROR at line 1:
ORA-00905: missing Keyword

Findings

1> spelling mistake at keword redundency (redundancy)

2> missing Keyword disk after FG2

Corrected Version of the command executed successfully

create diskgroup DATA normal redundancy FAILGROUP FG1 disk '/dev/oracleasm/disks/DISK5' FAILGROUP FG2 disk '/dev/oracleasm/disks/DISK6';

Diskgroup created.

How to Create RAC Database 12cR2

Step by Step instruction to Create 12c RAC Database


Once you are done with Grid Infrastructure Installation and Oracle DB Binary Installation you are ready create your first RAC database.


Step1: Execute DBCA from ORACLE_HOME/bin and follow the GUI instruction as shown below

cd /u01/app/oracle/product/12.2.0.2/db1

./dbca

choose create database and click Next


Choose advanced Configuration and click Next


Click Next


Select all the nodes on which you want to create the database and click Next


Choose appropriate (As per your requirement)Value for each field and Click Next


Choose the Appropriate Disk Group (in my case it is DATA) and click Next


You can enable the archivelog and specify the FRA (Flash Recovery Area) Location and Size. In this example I kept the archiving disabled. If left disabled you can enable it later


 Choose appropriate Memory Options and define the required charaterset from Character Set Tab and click Next


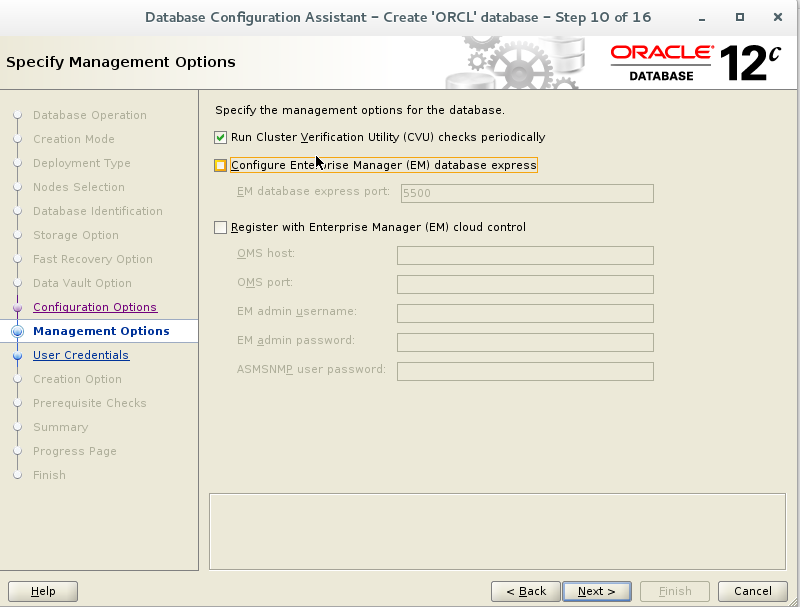
if you do not want to configure EM Express then untick it and click Next


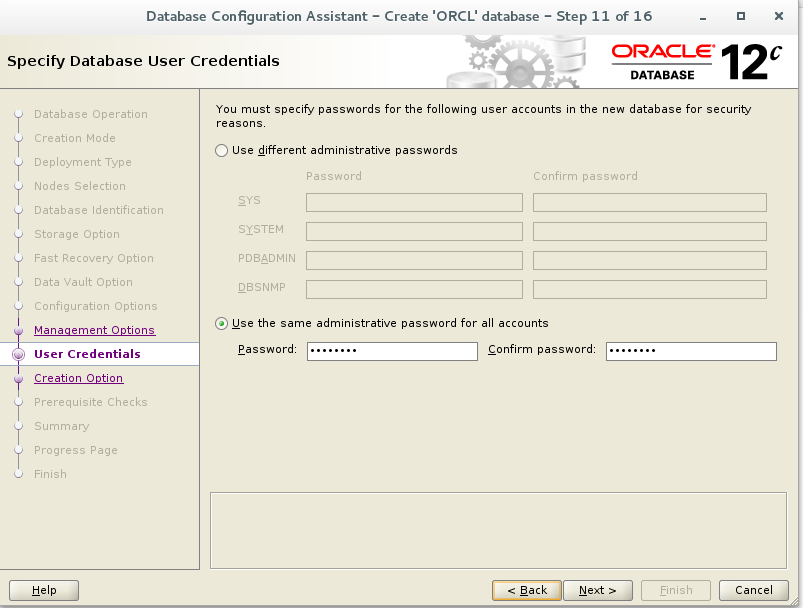
Enter the Password and click Next


Click Next


Click finish to create the database

Post successfull database creation validate the log files under $ORACLE_BASE/ cfgtoollogs/dbca/  (in my case /u01/app/oracle/cfgtoollogs/dbca/orcl)  and ensure there is no error.

Check the Status of the Database


Check the availibility of the database


$ srvctl status database -d orcl
Instance orcl1 is running on node node1
Instance orcl2 is running on node node2


check the configuration of the database

[oracle@node1 orcl]$ srvctl  config database -d orcl
Database unique name: orcl
Database name: orcl
Oracle home: /u01/app/oracle/product/12.2.0.2/db1
Oracle user: oracle
Spfile: +DATA/ORCL/PARAMETERFILE/spfile.272.947351843
Password file: +DATA/ORCL/PASSWORD/pwdorcl.256.947351319
Domain: oracle.com
Start options: open
Stop options: immediate
Database role: PRIMARY
Management policy: AUTOMATIC
Server pools:
Disk Groups: DATA
Mount point paths:
Services:
Type: RAC
Start concurrency:
Stop concurrency:
OSDBA group: dba
OSOPER group: dba
Database instances: ORCL1,ORCL2
Configured nodes: node1,node2
CSS critical: no
CPU count: 0
Memory target: 0
Maximum memory: 0
Default network number for database services:
Database is administrator managed


How to Install RAC Database 12cR2

Installing RAC Database 12cR2


Once you are done with Grid Infrastructure Installation, you are ready to install Oracle database binaries. The steps are very simple and you them right here

Step by Step RAC Database 12cR2 Installation.


Step1. Transfer the zipped database binaries to the target Server  (staging location) using your prefered method eg. Winscp

Step2. Unzip the binary at target Machine using the target Server Utility eg. unzip

$ unzip V839960-01.zip.

Note:- Do not unzip at source and then Transfer it to target.

Step3. Run Oracle Universal Installer  (OUI) by invoking  runInstaller from staging Location as Oracle user and follow the OUI instruction

$ ./runInstaller


Uncheck the security updates checkbox and click the "Next" button. Accept the warning by clicking yes


Select Install Database Software only Option and click next. If you want to install the Software and create the database as well then choose the Option accordingly.


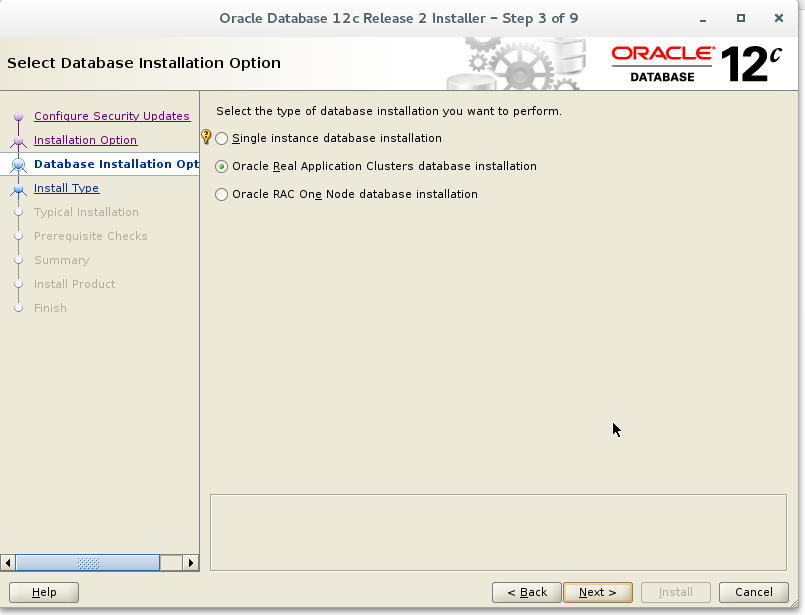
Select Oracle RAC database Installation and click Next


At this Screen select all the nodes in Cluster and proceed by clicking Next


Choose Enterprise Edition and click Next


Select appropriate Oracle Base and Oracle Home and click Next


Select appropriate OS Group and click Next


Ensure that all the Prerequisite Checks has been met and you are happy with the Summary then click on Install to start the Installation


Execute root.sh on bot the nodes as root user and respond to yes once you are done with root.sh execution


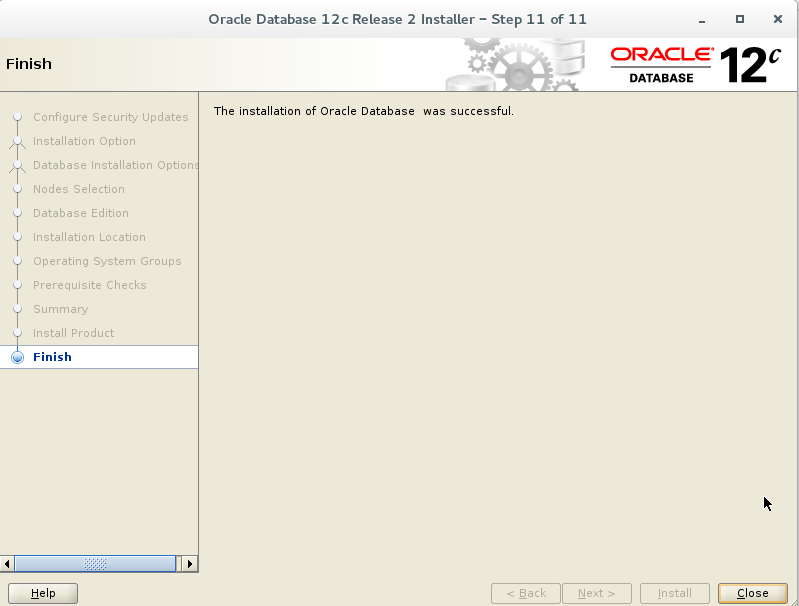
You are done with the Installation just click Close to Close the OUI.


Thanks for visiting here. Have fun with Oracle

Please leave you comments and Suggestions

ORA-00001 unique constraint (string.string) violated

ORA-00001 unique constraint (string.string) violated


Cause: An UPDATE or INSERT statement attempted to insert a duplicate key. Check the constraints on the table Insert and/or update is being performed

Action: Identify the valued in  Insert and/or update Statement which is already present in the table
Either remove the unique restriction or do not this duplicate value.

ORA-00018: maximum number of sessions exceeded


How to Fix ORA-00018: maximum number of sessions exceeded


Cause: All session state objects are in use.

Action: Increase the value of the SESSIONS initialization Parameter.

Steps.

Login to your database as sysdba

sqlplus / as sysdba

SQL: show parameter sessions

500

SQL: create pfile='/tmp/initORCL.ora' from spfile;

SQL: Alter System set sessions= 700 scope=both;


ORA-00020: maximum number of processes (string) exceeded

How to Resolve ORA-00020: maximum number of processes (string) exceeded


Cause: All process state objects are in use.

Action: Increase the value of the PROCESSES initialization Parameter.

Steps:


Login to your database as sysdba

sqlplus / as sysdba

SQL: show parameter processes

300

Backup your init file before changing the Parameter

SQL: create pfile='/tmp/initORCL.ora' from spfile;

SQL: Alter System set processes= 600 scope=spfile;

SQL: shutdown immediate

SQL: Startup

Note:- Since processes is an static Parameter you must restart the DB / Instance to bring the modified value in effect


How to Download Oracle Softwares

How to Download Software from Oracle E- delivery


How to Download Oracle Enterprise Linux 7 (OEL 7).


You can download the Software from Oracle E-delivery site.

Step1: Go to Oracle E- Delivery. Login with your username and password


Step 2: Search for Oracle Linux. Select x86-64 and click Continue to download.

How to Download Oracle Linux 7

How to Download  Oracle Virtual Box.


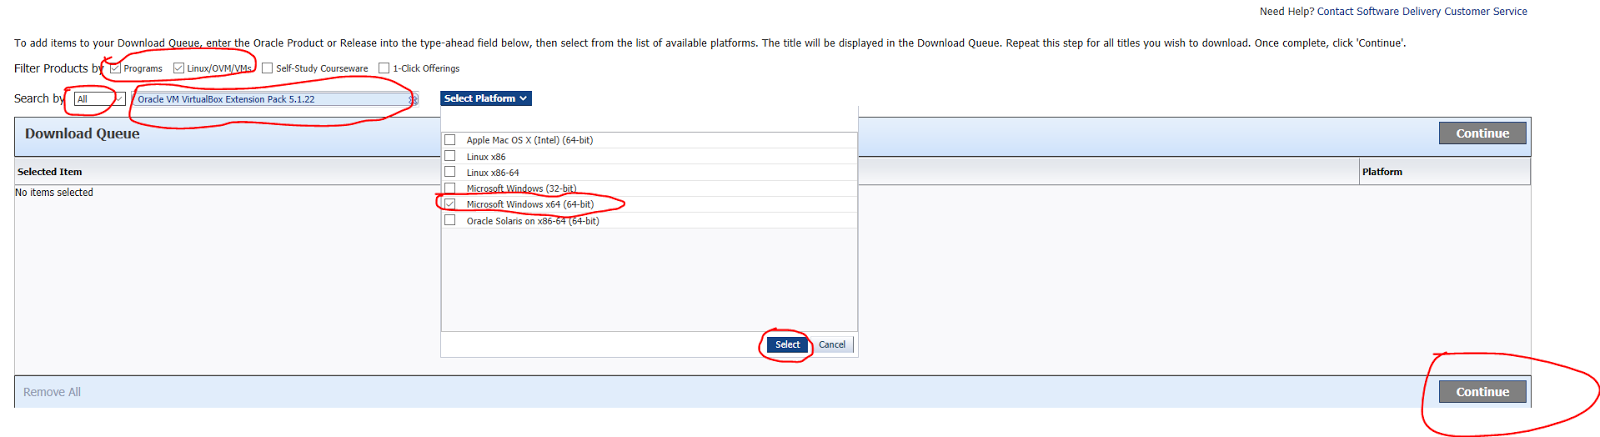
Step1: Go to Oracle E- Delivery. Login with your username and password

Step2: Search for Oracle VM Virtual Box. Select Platform for which you want to download and click continue.

How to Download Oracle Virtual Box

How to Download Oracle 12c Release 2


Step1: Go to Oracle E- Delivery. Login with your username and password

Step2: Search for Oracle Database Enterprise Edition (ASM, Database 12c...) Select required OS from Select Platform Option and click continue.

How to Download Oracle 12c Release 2


ORA-30036: unable to extend segment by 8 in undo tablespace


How to Resolve ORA-30036


Cause :- Undo tablespace is full.


Check how much free space availiable in UNDO tablespace

SELECT TABLESPACE_NAME,SUM(BYTES)/1024/1024/1024 "FREE SPACE(GB)"
FROM DBA_FREE_SPACE WHERE TABLESPACE_NAME='UNDOTBS1' GROUP BY TABLESPACE_NAME;


Solution:- Extend undo tablespace.


There are two possibilities

  1. Add a New datafile to UNDO tablespace,
  • ensure you have sufficient space under /mount_point where you are adding the datafile.
  • adjust path, size, autoexend etc according to your requirement 

alter tablespace UNDOTBS1 add datafile '/ora_app/product/oradata/oemrp/undotbs02.dbf' size 100M autoextend on next 100M maxsize unlimited;

Tablespace altered.

     2.  Resize the existing datafile if possible

alter database datafile '/ora_app/product/oradata/oemrp/undotbs01.dbf' resize 1G;
Database altered.