Oracle Database Listener an Overview

Oracle Listener


What is an Oracle Listener?


The listener is a process that runs on the database server . It receives incoming client connection requests and manages the traffic of these requests to the database server. One Listener can listen incoming Client request for more than one database.

Where is the Listener Configuration file Stored?

Oracle Listener configuration file is always located in ORACLE_HOME/network/admin Directory and named as listener.ora
where  ORACLE_HOME is the Location where you have Oracle Database binaries Installed.

How to Create Listener

Creating of Listener is really easy you just Need to put an Entry like below in your listener.ora file. If the file already does not exists just create it

Note:- use vi on Linux based Server or Notepad on Windows to edit the listener.ora file.

Sample listener.ora

LISTENER01 =
    (DESCRIPTION =
      (ADDRESS_LIST =
        (ADDRESS = (PROTOCOL = TCP)(HOST = node1.oracle.com)(PORT = 1521))
      )
    )

Optionally you can tell Listenr for what all database it must listen by entring the respective entries in below Format.

SID_LIST_LISTENER01 =
  (SID_LIST =
    (SID_DESC =
      (SID_NAME = DBNAME1)
      (ORACLE_HOME = /u01/app/oracle/product/11.2.0.4/db1)
    )
    (SID_DESC =
      (GLOBAL_DBNAME = DBNAME2.oracle.com)
      (ORACLE_HOME =/u01/app/oracle/product/11.2.0.4/db2)
      (SID_NAME = DBNAME2)
    )
  )

Oracle provides another GUI Methode to create Listener and the tool used here is called Oracle Network Configuration Assistence

on Linux based plateform you can invoke the Utility by entring below command, considering Oracle binaries are installed under /u01/app/oracle/product/11.2.0.4/db2

$export ORACLE_HOME==/u01/app/oracle/product/11.2.0.4/db2
$export PATH=$PATH:$ORACLE_HOME/bin
$netca

optionally you can nevigate under $ORACLE_HOME/bin and execute netca command from there

$ cd  /u01/app/oracle/product/11.2.0.4/db2/bin
$./netca

If you use NETCA (recommended) Methode to create the LISTENER it will not only just create the listener but also start it.

How to Start Listener in Oracle

$export ORACLE_HOME==/u01/app/oracle/product/11.2.0.4/db2
$export PATH=$PATH:$ORACLE_HOME/bin
$ lsnrctl start LISTENER01

How to Check the Staus of Listener in Oracle


$export ORACLE_HOME==/u01/app/oracle/product/11.2.0.4/db2
$export PATH=$PATH:$ORACLE_HOME/bin
$ lsnrctl Status LISTENER01

Where to find the Listener Log Oracle.

$ lsnrctl status LISTENER01
LSNRCTL for Linux: Version 12.2.0.1.0 - Production on 29-JUL-2017 15:10:56
Copyright (c) 1991, 2016, Oracle.  All rights reserved.
Connecting to (DESCRIPTION=(ADDRESS=(PROTOCOL=IPC)(KEY=LISTENER01)))
STATUS of the LISTENER
------------------------
Alias                     LISTENER01
Version                   TNSLSNR for Linux: Version 12.2.0.1.0 - Production
Start Date                29-JUL-2017 15:09:22
Uptime                    0 days 0 hr. 1 min. 34 sec
Trace Level               off
Security                  ON: Local OS Authentication
SNMP                      OFF
Listener Parameter File   /u01/app/12.2.0.2/grid/network/admin/listener.ora
Listener Log File         /u01/app/oracle/diag/tnslsnr/node2/listener01/alert/log.xml
Listening Endpoints Summary...
  (DESCRIPTION=(ADDRESS=(PROTOCOL=ipc)(KEY=LISTENER01)))
The listener supports no services
The command completed successfully


Oracle 12cR2 Must Know New Features


Oracle 12cR2 Must Know New Features


 SQL*Plus Command History


SQL*Plus now provides the ability to reissue the previously executed commands. This functionality is similar to the shell history command available on the UNIX platform command line Shells.


SQL> help history

 HISTORY
 -------
 Stores, lists, executes, edits of the commands entered during the current SQL*Plus session.
 HIST[ORY] [N {RUN | EDIT | DEL[ETE]}] | [CLEAR]
 N is the entry number listed in the history list.
 Use this number to recall, edit or delete the command.

Example:
 HIST 3 RUN - will run the 3rd entry from the list.
 HIST[ORY] without any option will list all entries in the list.

Imp Commands Usages Summary

help history
show history
set history on|off
set history 1000
HISTORY list
history edit
history delete
history clear


Detail Demonstration

sqlplus "/as sysdba"

SQL*Plus: Release 12.2.0.1.0 Production on Wed Jul 26 14:51:57 2017
Copyright (c) 1982, 2016, Oracle.  All rights reserved.

Connected to:
Oracle Database 12c Enterprise Edition Release 12.2.0.1.0 - 64bit Production

SQL> show pdbs;
    CON_ID CON_NAME                       OPEN MODE  RESTRICTED
---------- ------------------------------ ---------- ----------
         2 PDB$SEED                       READ ONLY  NO
         3 PDB1                           MOUNTED
SQL> alter session set container=PDB1;
Session altered.


SQL> history
SP2-1650: History is off, use "SET HIST[ORY] ON" to enable History.

Note:- By defautl the history Feature is OFF. If you wish to enjoy the benifit you have first enable it

SQL> SET HIST ON

SQL> history

SP2-1651: History list is empty.

SQL>  show pdbs;
    CON_ID CON_NAME                       OPEN MODE  RESTRICTED
---------- ------------------------------ ---------- ----------
         2 PDB$SEED                       READ ONLY  NO
         3 PDB1                           READ WRITE NO

SQL>  alter session set container=PDB1;
Session altered.

SQL> create table test (id number, test_desc varchar(100));
Table created.

SQL> insert into test (1, 'test positive');

insert into test (1, 'test positive')
                  *
ERROR at line 1:
ORA-00928: missing SELECT keyword


SQL> history;

  1   show pdbs;
  2   alter session set container=PDB1;
  3  create table test (id number, test_desc varchar(100));
  4  insert into test (1, 'test positive');

SQL> history 4 edit

SQL> history
  1   show pdbs;
  2   alter session set container=PDB1;
  3  create table test (id number, test_desc varchar(100));
  4  insert into test (1, 'test positive');
  5  insert into test values (1, 'test positive');
 
SQL> history 5 run;
1 row created.


Hope you likeed the Post and you will enjoy the Beauty of this NF. Please Keep on checking Oracle by Anand to learn the awsome NF of Oracle 12cR2


Have Fun!!!!!and Do not Forget to Leave your Comment in the Comment Section below.


mysqldump: Error: Binlogging on server not active

How to Fix Error: Binlogging on server not active


# mysqldump --all-databases --user=root --password --master-data > Fullbackup_26Jul2017.sql
Enter password:

mysqldump: Error: Binlogging on server not active.

While trying to backup the MySQL Databases I am experiencing this error. The error is pretty much self explaining and the simply the reason is that the logging is not enabled and I am trying an online backup

Resolution 1: Take Cold backup Instead of Hotbackup

How to Perform MySQL Database Backup

Cold Backups

Cold backups are a type of physical backup as you copy the database files while the database is offline.

Cold Backup

The basic process of a cold backup involves stopping MySQL, copying the files, the restarting MySQL. You can use whichever method you want to copy the files (cp, scp, tar, zip etc.).

# service mysql stopShutting down MySQL.. SUCCESS!

#cd /var/lib/mysql
#cp -r * /u01/stage/backup

# service mysql startStarting MySQL... SUCCESS!
[root@node1 mysql]#


Resolution 2: Enable Binlogging and then trigger the Logical Backup Again

How to Enable Binary Logging in MySQL

To enable the binary logs, edit the "/etc/my.cnf"  uncomment the line log_bin and restart the MySQL


#service mysql stop
Shutting down MySQL.. SUCCESS!
# service mysql start
Starting MySQL. SUCCESS!

mysql> show variables like 'log_bin';
+---------------+-------+
| Variable_name | Value |
+---------------+-------+
| log_bin       | ON    |
+---------------+-------+
1 row in set (0.00 sec)


mysqldump --all-databases --user=root --password --master-data > Fullbackup_26Jul2017.sql
Enter password:


Oracle 12cR2 – How to Setup Oracle Wallets

Step by Step how to setup Oracle Wallet to avoid Keying in the Password or Saving the Password in an Script file


Are you really concerned about Security. Are you not willing to save the password in a file or not willing to key in as and when required.

Then you must read this blog until the end

Create directory to hold wallet

mkdir -p /u01/app/oracle/admin/wallet
Enter wallet information in your sqlnet.ora

WALLET_LOCATION =
   (SOURCE =
     (METHOD = FILE)
     (METHOD_DATA =
       (DIRECTORY = /u01/app/oracle/admin/wallets)
     )
   )
SQLNET.WALLET_OVERRIDE = TRUE
SSL_CLIENT_AUTHENTICATION = FALSE
SSL_VERSION = 0


Now, create the wallet and the credentials

$ mkstore -wrl /u01/app/oracle/admin/wallets -create

Oracle Secret Store Tool : Version 12.2.0.1.0
Copyright (c) 2004, 2016, Oracle and/or its affiliates. All rights reserved.
Enter password:
Enter password again:

$ mkstore -wrl /u01/app/oracle/admin/wallets -createCredential ORCL1 SYS

Oracle Secret Store Tool : Version 12.2.0.1.0
Copyright (c) 2004, 2016, Oracle and/or its affiliates. All rights reserved.
Your secret/Password is missing in the command line
Enter your secret/Password:
Re-enter your secret/Password:
Enter wallet password:

$ mkstore -wrl /u01/app/oracle/admin/wallets -listCredential

Oracle Secret Store Tool : Version 12.2.0.1.0
Copyright (c) 2004, 2016, Oracle and/or its affiliates. All rights reserved.
Enter wallet password:
List credential (index: connect_string username)
1: ORCL1 SYS

$ cd /u01/app/oracle/admin/wallets/
$ ls -l


-rw-------. 1 oracle oinstall 581 Jun 24 17:47 cwallet.sso
-rw-------. 1 oracle oinstall   0 Jun 24 17:43 cwallet.sso.lck
-rw-------. 1 oracle oinstall 536 Jun 24 17:47 ewallet.p12
-rw-------. 1 oracle oinstall   0 Jun 24 17:43 ewallet.p12.lck


sqlplus /@ORCL1 as sysdba

SQL*Plus: Release 12.2.0.1.0 Production on Sat Jun 24 18:20:54 2017
Copyright (c) 1982, 2016, Oracle.  All rights reserved.

Connected to:
Oracle Database 12c Enterprise Edition Release 12.2.0.1.0 - 64bit Production

SQL>

Did you change your Sys User password? Are you worried now about your Wallet?
No problem just update the wallet Password

mkstore -wrl /u01/app/oracle/admin/wallets -modifyCredential ORCL1 SYS

Hope you have enjoyed the post.

Please feel free to post your Questions/Comments/Suggestions. I would be happy to Answer your queries


ORA-12578: TNS:wallet open failed


ORA-12578: TNS:wallet open failed

Are you facing ORA-12578: TNS:wallet open failed. No Problem you are at right place then.

$ sqlplus /@ORCL1 as sysdba

SQL*Plus: Release 12.2.0.1.0 Production on Sat Jun 24 17:51:12 2017
Copyright (c) 1982, 2016, Oracle.  All rights reserved.
ERROR:
ORA-12578: TNS:wallet open failed

Easiest way to resolve the issue by changing WALLET_OVERRIDE = TRUE to FALSE in SQLNET.ORA

edit your sqlnet.ora file and modify SQLNET.WALLET_OVERRIDE parameter value from TRUE to FALSE.
Change this:
SQLNET.WALLET_OVERRIDE = TRUE

to this:
SQLNET.WALLET_OVERRIDE = FALSE

Try Again.

Hope this helps


Cluster Resource Activity Log Oracle RAC 12c

Cluster Resource Activity Log Oracle RAC 12c: Explained


What is Cluster Resource Activity Log?


Oracle Clusterware stores logs about resource failures in the cluster resource activity log, which is located in the Grid Infrastructure Management Repository.

Where to Find Cluster Resource Activity Log?

Cluster Resource Activity Log is stored in Grid Infrastructure Management Repository Database

Managing the Cluster Resource Activity Log

How to Query the cluster resource activity logs ?


$crsctl query calog

2017-06-17 17:15:57.133000 : Starting Oracle Cluster Ready Services-managed resources on server 'node1' : 149771255713213096/0/1 :
2017-06-17 17:15:57.143000 : Server 'node1' has been assigned to pool 'Free'. : 149771255713213096/0/2 :
2017-06-17 17:17:08.580000 : Resource 'ora.net1.network' has been registered. : 149771255713213096/152/1 :
2017-06-17 17:17:16.867000 : Resource 'ora.node1.vip' has been registered. : 149771255713213096/186/1 :
.
.
.
2017-06-17 18:29:13.580000 : detected unplanned state change of resource 'ora.scan2.vip' from state 'ONLINE' to 'OFFLINE' : 149771255713213096/3861/1 :
2017-06-17 18:29:13.616000 : Attempting to clean 'ora.scan2.vip' on 'node1' : 149771255713213096/3861/2 :
2017-06-17 18:29:13.671000 : detected unplanned state change of resource 'ora.LISTENER_SCAN2.lsnr' from state 'ONLINE' to 'OFFLINE' : 149771255713213096/3864/1 :
2017-06-17 18:29:13.848000 : Start of 'ora.net1.network' on 'node1' failed : 149771255713213096/3860/3 :
2017-06-17 18:29:13.848000 : Attempting to clean 'ora.net1.network' on 'node1' : 149771255713213096/3860/4 :
2017-06-17 18:29:13.859000 : Clean of 'ora.scan2.vip' on 'node1' succeeded : 149771255713213096/3861/3 :
2017-06-17 18:29:13.860000 : Attempting to start 'ora.scan2.vip' on 'node2' : 149771255713213096/3861/4 :
2017-06-17 18:29:13.882000 : detected unplanned state change of resource 'ora.scan3.vip' from state 'ONLINE' to 'OFFLINE' : 149771255713213096/3866/1 :


How much space is allocated for Cluster Resource Activity Log?

$ crsctl get calog maxsize

CRS-6760: The maximum size of the Oracle cluster activity log is 1024 MB.

What is Retention Time for Resource Activity Log ?

$ crsctl get calog retentiontime

CRS-6781: The retention time of the cluster activity log is 73 hours.

Can We Change the Size and Retention time ?

yes you can Change it as follows

$crsctl set calog maxsize 2048

$ crsctl get calog maxsize

CRS-6760: The maximum size of the Oracle cluster activity log is 2048 MB.

Note if you try to reduce the MaxSize you must use -f Option

$ crsctl set calog maxsize 1024

CRS-40020: The operation will delete all entries in cluster activity log. Rerun with '-f' option.
CRS-4000: Command Set failed, or completed with Errors.

$ crsctl set calog maxsize 1024 -f
$ crsctl get calog maxsize

CRS-6760: The maximum size of the Oracle cluster activity log is 1024 MB.

Changing the Retention Time

$ crsctl set calog retentiontime 80
$ crsctl get calog retentiontime

CRS-6781: The retention time of the cluster activity log is 80 hours.

Note if you try to reduce the Retention Time you must use -f Option

$ crsctl set calog retentiontime 70

CRS-40020: The operation will delete all entries in cluster activity log. Rerun with '-f' option.
CRS-4000: Command Set failed, or completed with errors.

$ crsctl set calog retentiontime 70 -f
$ crsctl get calog retentiontime

CRS-6781: The retention time of the cluster activity log is 70 hours.
I hope you have enjoyed the post. If you like my work please leave your Comments/ Suggestions in the Comment Section.

If you have any questions please leave in comment Section I will try to answer ASAP


What all you can query with crsctl query command in 12cR2

Complete Reference of crsctl query Command RAC 12cR2


Display CRS admin list

$ crsctl query crs administrator
CRS Administrator List: oracle root
    
Gets the value of automatic start delay and server Count

$ crsctl query crs autostart
'Autostart delay':       0
'Autostart servercount': 1

Lists the Oracle Clusterware active Version

$ crsctl query crs activeversion
Oracle Clusterware active version on the cluster is [12.2.0.1.0]

List the cluster state and active patch Level

$ crsctl query crs activeversion -f
Oracle Clusterware active version on the cluster is [12.2.0.1.0]. The cluster upgrade state is [NORMAL]. The cluster active patch level is [0].

Lists the Oracle Clusterware release version
    
$ crsctl query crs releaseversion
Oracle High Availability Services release version on the local node is [12.2.0.1.0]
Lists the version of Oracle Clusterware software installed

$ crsctl query crs softwareversion -all
Oracle Clusterware version on node [node1] is [12.2.0.1.0]
Oracle Clusterware version on node [node2] is [12.2.0.1.0]

Lists the Oracle Clusterware release patch level
 
$ crsctl query crs releasepatch
Oracle Clusterware release patch level is [0] and no patches have been applied on the local node.
Lists the patch level of Oracle Clusterware software installed

$ crsctl query crs softwarepatch
Oracle Clusterware patch level on node node1 is [0].
Lists the Last active timestamp of a leaf node in case of Flex Cluster

$ crsctl query crs lastactivetimestamp
  CRS-41006: Node node1 is not a leaf node.
Note:- you will get proper oputput if you have Flex Cluster configurtion
 
List the site to which the node or disk belongs.
 
$ crsctl query crs site -n node1
Node 'node1' belongs to site 'rac01'
$ crsctl query crs site -d DISK1
Disk 'DISK1' belongs to site 'rac01'

Checks whether Oracle Clusterware has been configured for IPMI

$   crsctl query css ipmiconfig
CRS-4237: Oracle Clusterware is not fully configured to use IPMI
Checks whether the IPMI device/driver is present

$ crsctl query css ipmidevice
CRS-4218: Unable to access an IPMI device on this system
    
Lists the voting files used by Cluster Synchronization Services
$ crsctl query css votedisk
##  STATE    File Universal Id                File Name Disk group
--  -----    -----------------                --------- ---------
 1. ONLINE   c3723335e2f14f2abf29a7f3e1f8d2cf (/dev/oracleasm/disks/DISK2) [OCR_VOT]
 2. ONLINE   d70e3c6100f34f32bff4d18de037ed7b (/dev/oracleasm/disks/DISK1) [OCR_VOT]
 3. ONLINE   c28a7ab739174f41bf61e9fef170a291 (/dev/oracleasm/disks/DISK3) [OCR_VOT]
Located 3 voting disk(s).

Check if the designated wallet or user exists
    
crsctl query wallet -type [-name ] [-user | -all]
where
     wallet_type     Type of wallet i.e. APPQOSADMIN, APPQOSUSER, APPQOSDB, MGMTDB, OSUSER or CVUDB.
     name            Name is required for APPQOSDB and CVUDB wallets.
     user_name       User to be queried from wallet.
     all             List all users in wallet

List the system configured DNS server, search paths, attempt and timeout values

$ crsctl query dns -servers
CRS-10018: the following configuration was found on the system:
CRS-10019: There are 1 domains in search order. They are:
oracle.com
CRS-10022: There are 1 name servers. They are:
192.9.1.102
CRS-10020: number of retry attempts for name lookup is: 4
CRS-10021: timeout for each name lookup is: 5

query the resolution of Server from DNS

  crsctl query dns -name [-dnsserver ] [-type ] [-port ] [-attempts ] [-timeout ] [-v]   

Where
    name                Fully qualified domain name to lookup
    DNS_server_address  Address of the DNS server on which name needs to be looked up
    query_type          The query type is A or AAAA for IPv4 or IPv6 respectively. The default query_type is A.
    port                Port on which DNS server is listening
    attempts            Number of retry attempts
    timeout             Timeout in seconds

$ crsctl query dns -name node1.oracle.com -dnsserver 192.9.1.102
CRS-10024: DNS server returned 192.9.1.100  for name node1.oracle.com

$ crsctl query dns -name scan -dnsserver 192.9.1.102
CRS-10024: DNS server returned 192.9.1.120 192.9.1.121 192.9.1.122  for name scan

List the cluster resource Activity log.

  crsctl query calog [-aftertime ] [-beforetime ] [-duration | -follow] [-filter ] [-fullfmt | -xmlfmt]

 List the valid credentials targets to be used with credentials commands

$ crsctl query credentials targetlist

List the valid credentials under a specific target

crsctl query credentials -target
List the nodes and disks that the sites contain.

  crsctl query cluster site { | -all}
Where
       site_name             The site name to be queried
       -all                  List all sites.

$ crsctl query cluster site -all

Site 'rac01' identified by GUID 'b8d38f6a064f6f7aff8334e9061f3cc4' in state 'ENABLED' contains nodes 'node1,node2' and no disk.
Obtain Member Cluster Configuration Information
 
crsctl query member_cluster_configuration []

where
        member_cluster_name    Name of the Member Cluster
         If no member cluster name is provided then the details of all
         the member clusters are displayed.

ORA-44787: Service cannot be switched into

Hot Fix ORA-44787: Service cannot be switched into


SQL> alter session set container=GIMR_DSCREP_10;
ERROR:
ORA-44787: Service cannot be switched into.


Cause: The service did not exist in the new pluggable database or the service was not started in the pluggable database.

Action: Use a valid service name for the pluggable database or start the service in the pluggable database first.

The Easiest way to resolve this issue is,  Restart the PDB.

Note:- Please be Aware of the fact that restarting the PDB will lead to downtime of the PDB

SQL> alter pluggable database GIMR_DSCREP_10 close immediate;

Pluggable database altered.

SQL> alter pluggable database GIMR_DSCREP_10 open;
Pluggable database altered.

SQL> alter session set container=GIMR_DSCREP_10;
Session altered.

CRS-09118: Grid Infrastructure Management Repository connection error

How to Resolve CRS-09118: Grid Infrastructure Management Repository connection error 12cR2 RAC


crsctl query catlog
CRS-09118: Grid Infrastructure Management Repository connection error

The crsctl Utility is not able to comunicate with Management database

checking repository database configuration

$ srvctl config mgmtdb
Database unique name: _mgmtdb
Database name:
Oracle home:
Oracle user: oracle
Spfile: +DATA_MGMT/_MGMTDB/PARAMETERFILE/spfile.269.946921407
Password file:
Domain:
Start options: open
Stop options: immediate
Database role: PRIMARY
Management policy: AUTOMATIC
Type: Management
PDB name: GIMR_DSCREP_10
PDB service: GIMR_DSCREP_10

Cluster name: RAC01
Database instance: -MGMTDB

check if PDB service is registered with MGMTLSNR

lsnrctl status MGMTLSNR | grep -i GIMR_DSCREP_10

As you can see the Service is not registered with Listener

checking repository database for PDB service existance

Login in management database and execute following queries

$ export ORACLE_HOME=/u01/app/12.2.0.2/grid
$ export PATH=$PATH:$ORACLE_HOME/bin
$ export ORACLE_SID=-MGMTDB
$ sqlplus "/as sysdba"

SQL> show con_name

CON_NAME
------------------------------
CDB$ROOT
SQL>
SQL>
SQL> show pdbs
    CON_ID CON_NAME                       OPEN MODE  RESTRICTED
---------- ------------------------------ ---------- ----------
         2 PDB$SEED                       READ ONLY  NO
         3 GIMR_DSCREP_10                 MOUNTED

SQL> alter session set container=GIMR_DSCREP_10;
Session altered.
SQL> select name from dba_services;
NAME
----------------------------------------------------------------
gimr_dscrep_10

-- As you can see Service is Present

Let's start the Service

SQL> exec dbms_service.start_service('gimr_dscrep_10')

$ lsnrctl status MGMTLSNR | grep -i GIMR_DSCREP_10

Service "gimr_dscrep_10" has 1 instance(s).

Now the listener is listining for gimr_dscrep_10 Service and Connection is successfull


How to create an ASM diskgroup

Create ASM Disk Group


Step1:

Set ASM Environment and Login to your ASM instance as sysasm

[oracle@node2 ~]$ export ORACLE_HOME=/u01/app/12.2.0.2/grid
[oracle@node2 ~]$ export PATH=$PATH:$ORACLE_HOME/bin
[oracle@node2 ~]$ export ORACLE_SID=+ASM2
[oracle@node2 ~]$ sqlplus "/as sysasm"

Step2:

Identify the availiable Candidate/Provisioned disks

set line 200
col path for a50
select MOUNT_STATUS,HEADER_STATUS,STATE,PATH from v$asm_disk

MOUNT_S HEADER_STATU STATE    PATH
------- ------------ -------- ------------------------------------------------------------
CLOSED  PROVISIONED  NORMAL   /dev/oracleasm/disks/DISK5
CLOSED  PROVISIONED  NORMAL   /dev/oracleasm/disks/DISK6
CLOSED  PROVISIONED  NORMAL   /dev/oracleasm/disks/DISK8
CLOSED  PROVISIONED  NORMAL   /dev/oracleasm/disks/DISK7
CACHED  MEMBER       NORMAL   /dev/oracleasm/disks/DISK4
CACHED  MEMBER       NORMAL   /dev/oracleasm/disks/DISK3
CACHED  MEMBER       NORMAL   /dev/oracleasm/disks/DISK2
CACHED  MEMBER       NORMAL   /dev/oracleasm/disks/DISK1
8 rows selected.

Step3:

create diskgroup DATA normal redundancy FAILGROUP FG1 disk '/dev/oracleasm/disks/DISK5' FAILGROUP FG2 disk '/dev/oracleasm/disks/DISK6';

Diskgroup created.

Note:- if you are creating diskgroup on RAC ensure the diskgroup is mounted on 2nd node. If it is not mounted you must mount it.

select INST_ID,NAME,STATE from gv$asm_diskgroup;

   INST_ID NAME                           STATE
---------- ------------------------------ -----------
         1 DATA_MGMT                      MOUNTED
         1 OCR_VOT                        MOUNTED
         1 DATA                           MOUNTED
         2 DATA                           DISMOUNTED
         2 DATA_MGMT                      MOUNTED
         2 OCR_VOT                        MOUNTED
6 rows selected.

SQL> alter diskgroup DATA mount;
Diskgroup altered.

SQL> select INST_ID,NAME,STATE from gv$asm_diskgroup;

   INST_ID NAME                           STATE
---------- ------------------------------ -----------
         1 DATA_MGMT                      MOUNTED
         1 OCR_VOT                        MOUNTED
         1 DATA                           MOUNTED
         2 DATA_MGMT                      MOUNTED
         2 OCR_VOT                        MOUNTED
         2 DATA                           MOUNTED
6 rows selected.

How to Change the Compatible Attribute of ASM Diskgroup


ALTER DISKGROUP DATA SET ATTRIBUTE 'compatible.asm' = '12.1';
Diskgroup altered.

ALTER DISKGROUP DATA SET ATTRIBUTE 'compatible.rdbms' = '12.1';
Diskgroup altered.


ORA-00905: missing keyword

How to fix ORA-00905: missing Keyword


ERROR at line 1:
ORA-00905: missing Keyword

Cause

You tried to execute a statement, but you missed a required Keyword

Resolution

Verify the Syntax correct the Errors and rerun it.

An example

QL>  create diskgroup DATA normal redundency FAILGROUP FG1 disk '/dev/oracleasm/disks/DISK5' FAILGROUP FG2 '/dev/oracleasm/disks/DISK6';

 create diskgroup DATA normal redundency FAILGROUP FG1 disk '/dev/oracleasm/disks/DISK5' FAILGROUP FG2 '/dev/oracleasm/disks/DISK6'
                              *
ERROR at line 1:
ORA-00905: missing Keyword

Findings

1> spelling mistake at keword redundency (redundancy)

2> missing Keyword disk after FG2

Corrected Version of the command executed successfully

create diskgroup DATA normal redundancy FAILGROUP FG1 disk '/dev/oracleasm/disks/DISK5' FAILGROUP FG2 disk '/dev/oracleasm/disks/DISK6';

Diskgroup created.

How to Create RAC Database 12cR2

Step by Step instruction to Create 12c RAC Database


Once you are done with Grid Infrastructure Installation and Oracle DB Binary Installation you are ready create your first RAC database.


Step1: Execute DBCA from ORACLE_HOME/bin and follow the GUI instruction as shown below

cd /u01/app/oracle/product/12.2.0.2/db1

./dbca

choose create database and click Next


Choose advanced Configuration and click Next


Click Next


Select all the nodes on which you want to create the database and click Next


Choose appropriate (As per your requirement)Value for each field and Click Next


Choose the Appropriate Disk Group (in my case it is DATA) and click Next


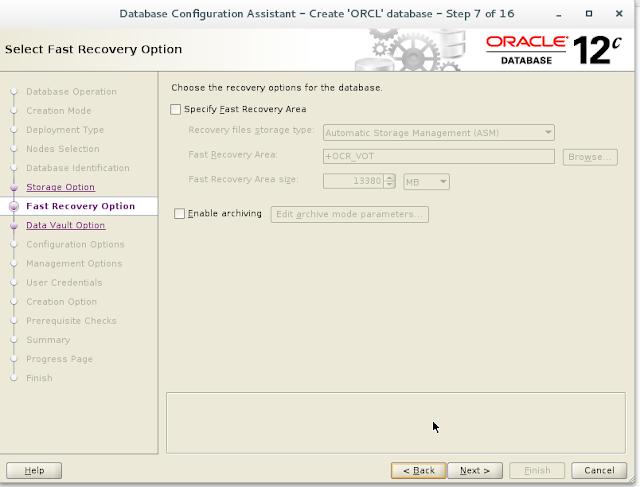
You can enable the archivelog and specify the FRA (Flash Recovery Area) Location and Size. In this example I kept the archiving disabled. If left disabled you can enable it later


 Choose appropriate Memory Options and define the required charaterset from Character Set Tab and click Next


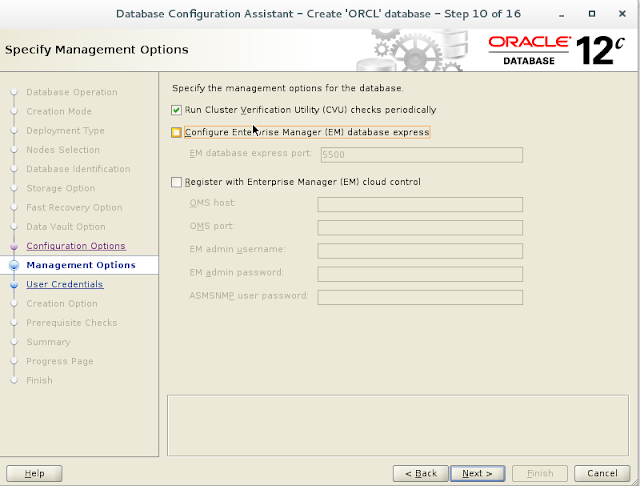
if you do not want to configure EM Express then untick it and click Next


Enter the Password and click Next


Click Next


Click finish to create the database

Post successfull database creation validate the log files under $ORACLE_BASE/ cfgtoollogs/dbca/  (in my case /u01/app/oracle/cfgtoollogs/dbca/orcl)  and ensure there is no error.

Check the Status of the Database


Check the availibility of the database


$ srvctl status database -d orcl
Instance orcl1 is running on node node1
Instance orcl2 is running on node node2


check the configuration of the database

[oracle@node1 orcl]$ srvctl  config database -d orcl
Database unique name: orcl
Database name: orcl
Oracle home: /u01/app/oracle/product/12.2.0.2/db1
Oracle user: oracle
Spfile: +DATA/ORCL/PARAMETERFILE/spfile.272.947351843
Password file: +DATA/ORCL/PASSWORD/pwdorcl.256.947351319
Domain: oracle.com
Start options: open
Stop options: immediate
Database role: PRIMARY
Management policy: AUTOMATIC
Server pools:
Disk Groups: DATA
Mount point paths:
Services:
Type: RAC
Start concurrency:
Stop concurrency:
OSDBA group: dba
OSOPER group: dba
Database instances: ORCL1,ORCL2
Configured nodes: node1,node2
CSS critical: no
CPU count: 0
Memory target: 0
Maximum memory: 0
Default network number for database services:
Database is administrator managed


How to Install RAC Database 12cR2

Installing RAC Database 12cR2


Once you are done with Grid Infrastructure Installation, you are ready to install Oracle database binaries. The steps are very simple and you them right here

Step by Step RAC Database 12cR2 Installation.


Step1. Transfer the zipped database binaries to the target Server  (staging location) using your prefered method eg. Winscp

Step2. Unzip the binary at target Machine using the target Server Utility eg. unzip

$ unzip V839960-01.zip.

Note:- Do not unzip at source and then Transfer it to target.

Step3. Run Oracle Universal Installer  (OUI) by invoking  runInstaller from staging Location as Oracle user and follow the OUI instruction

$ ./runInstaller


Uncheck the security updates checkbox and click the "Next" button. Accept the warning by clicking yes


Select Install Database Software only Option and click next. If you want to install the Software and create the database as well then choose the Option accordingly.


Select Oracle RAC database Installation and click Next


At this Screen select all the nodes in Cluster and proceed by clicking Next


Choose Enterprise Edition and click Next


Select appropriate Oracle Base and Oracle Home and click Next


Select appropriate OS Group and click Next


Ensure that all the Prerequisite Checks has been met and you are happy with the Summary then click on Install to start the Installation


Execute root.sh on bot the nodes as root user and respond to yes once you are done with root.sh execution


You are done with the Installation just click Close to Close the OUI.


Thanks for visiting here. Have fun with Oracle

Please leave you comments and Suggestions

ORA-00001 unique constraint (string.string) violated

ORA-00001 unique constraint (string.string) violated


Cause: An UPDATE or INSERT statement attempted to insert a duplicate key. Check the constraints on the table Insert and/or update is being performed

Action: Identify the valued in  Insert and/or update Statement which is already present in the table
Either remove the unique restriction or do not this duplicate value.

Oracle Databasd: Response Time Definition

What is Database Response Time ?


The database responce time consists of the "Service Time" and "wait time"

Responce Time= Service Time + Wait Time

Where

Service Time is the amount of time a process spends on CPU

Wait Time is the amount of time a process waits for a specific resources to be availiable before
continuing with processing.